How to configure GOFO in techSHIP
Last updated: October 5, 2026
This guide explains how to add and configure this carrier connection, review its available carrier-specific settings, and understand the shipment requirements and operational constraints that apply.
Carrier Requirements and Specifications
This section summarizes onboarding requirements and lists confirmed carrier-specific constraints.
To review all supported carriers and their specific requirements, see: techSHIP supported Carriers - Master List [Guides List].
Onboarding Requirements
The GOFO integration supports:
Small Parcel shipping within the United States
Test mode
Label generation
Rate estimation and Rate Shopping
Void Orders
Four Label References
Sender Address Override
Multi-package orders, with separate tracking numbers and labels for each package
Information to be Provided
The following credentials and data points are mandatory to connect to GOFO. Ensure you have these items available before starting the setup:
DATA ELEMENT | SOURCE (HOW TO OBTAIN) |
|---|---|
API username | Provided by GOFO for the applicable test or production account. |
API password | Provided by GOFO for the applicable test or production account. |
Sender Address | Provided by your shipping facility, including street address, city, state, ZIP code, and country. |
Contact Name | Provided by your shipping facility. |
Contact Phone | Provided by your shipping facility. |
Settings to be Verified
The following account configurations must be validated to prevent errors during the connection setup or the shipping process:
FEATURE/SETTING | VALIDATION ACTION |
|---|---|
Account and service access | Confirm with GOFO that your account is enabled for the intended environment and services. |
Settlement configuration | Confirm with GOFO that receivable settlement settings are configured for the services you will use. Missing settlement configuration can prevent rate retrieval and shipment processing. |
Entry port | Confirm the appropriate entry port with GOFO before configuring the Client Account. |
Pickup schedule | Have your facility's pickup open time, close time, and ready hours available for the Baseline Account setup. |
Specifications and Constraints
Operational Details
This section lists confirmed operational rules and limitations for this carrier:
GOFO supports U.S. domestic shipping only. Regional and international shipping are not supported.
Available services are GOFO Parcel Pickup and GOFO Ground Pickup, subject to your account's service access and settlement configuration.
Each package in a multi-package order receives its own tracking number and label and has a separate carrier cancellation.
Shipment processing requires a successful rate for the selected service.
Each package requires a weight between 0.001 and 99 lb and length, width, and height between 1 and 999 inches.
Ship-from and ship-to phone numbers are required and must contain 10–14 characters.
Delivery instructions cannot exceed 120 characters.
Package value is calculated from line-item prices and quantities in USD, with a minimum value of 1. When no line items exist, the integration supplies a default item and a package value of 1.
Item quantities must be whole numbers. Positive fractional quantities are rejected.
Labels
The following table summarizes confirmed document support:
ITEM | SUPPORTED |
|---|---|
References | Yes — four optional references. |
BOL | No. |
The following Label Reference limits are documented for GOFO:
CONSTRAINT TYPE | LIMIT/REQUIREMENT | NOTES |
|---|---|---|
Reference 1 | 30 characters | Optional. |
Reference 2 | 30 characters | Optional. |
Reference 3 | 32 characters | Optional. |
Reference 4 | 32 characters | Optional. |
Empty references | Omitted | A configured reference is omitted when its selected source resolves to an empty value. |
For a comprehensive guide on how to use label references, see: Using order References in your labels [Step-by-Step guide].
Configuring a Baseline Account
A Baseline Account serves as the fundamental connection point between techSHIP and the carrier's system. It acts as a template that holds the credentials and fundamental properties required to process shipments.
The techSHIP AI Assistant is available from the Carrier page for supported Carrier configuration tasks. For detailed conceptual information and advanced configuration, refer to techSHIP AI Assistant: Overview & Availability [Information].
Adding a Carrier
Before adding an account, you must ensure the Carrier entity is available for your location.
Click My Carriers from the left menu under the Carriers category.
Click Add Carrier.

Select the desired Carrier.
You may encounter additional messages depending on the carrier status or your plan:
Subscription Required (⭐): If the carrier has a star icon, you will see a message stating "To use this carrier, a subscription upgrade is required." Press Contact to Upgrade to proceed.

Carrier Suspended: If the carrier has not been used for an extended period, you will see a message stating “This carrier is currently on hold...” Click Request Assistance to reactivate it.

Setup Fee Waived: If a carrier from the same carrier group is already installed in your location, you can add this carrier without incurring additional fees.

If needed, update the carrier Name.
Click Add Carrier. Once the Carrier is added, you will be automatically redirected to the Carrier page to continue setting it up.
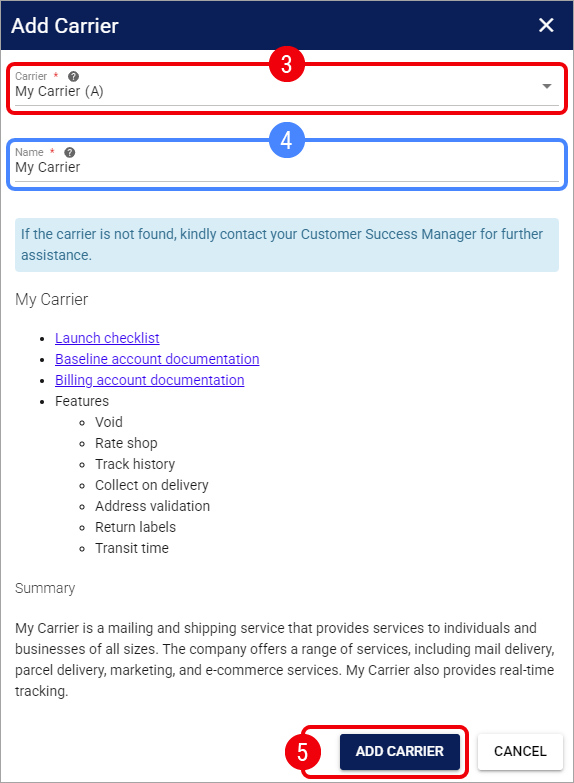
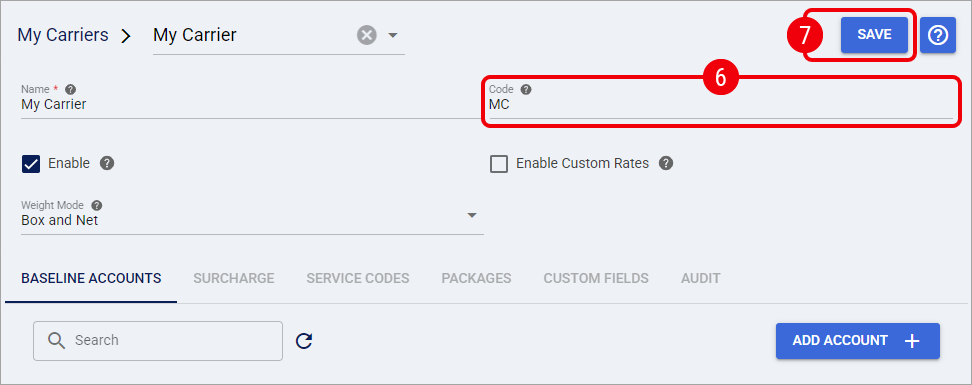
Enter the Code of the Carrier as it appears in your host system.
The Code of the Carrier must match exactly the value defined in the host system. Any discrepancy (including casing or extra spaces) may prevent the carrier from working correctly.
Click Save.
If your facility utilizes the centralized Pickup Schedule, we highly recommend adding this new carrier to your calendar now. While not required to process labels, this ensures accurate induction metrics for your Insights dashboards. To learn more, see Understanding the Centralized Pickup Schedule & Expected Induction Logic [Information].
Adding a Baseline Account
From the Carrier page, click Add Account to create a new Baseline Account.

You will be redirected to the Baseline Account page to complete the setup.
Entering incorrect values will prevent the system from generating shipping labels.
General Tab
In the General tab, define the administrative properties:

Name: Enter a descriptive name for the account.
Ensure to enter a descriptive name based on unique properties. E.g.:
Carrier Name - Account Number (CarrierX - 123456789)
Carrier Name - Consolidator Name (CarrierY - MyConsolidator)
Carrier Name
Usage: Select the most suitable option:
Test: Used for sandbox or onboarding purposes.
Production: Used for live shipping.
Keep the Status field set to its default Active value. An account must be Active to remain fully editable. For detailed conceptual information on account statuses, refer to How to Inactivate and Activate a Carrier Baseline Account [Step-by-Step Guide].
Carrier Tab
The Carrier tab contains the Baseline Account fields used to identify the carrier connection and define confirmed carrier-specific behavior. Fields for GOFO are:
Username: Enter the API username provided by GOFO. Required.
Password: Enter the API password provided by GOFO. Required.
Pickup open time: Enter your facility's pickup opening time. Required.
Pickup close time: Enter your facility's pickup closing time. Required. The closing time is applied to the same date as the resolved shipment pickup date.
Pickup ready hours: Enter the time needed for your facility to prepare shipments for pickup. Required.
Weekends mode: Configure how weekends are handled when determining pickup dates.
Sender address: Enter your shipping facility's address and contact name.
Phone: Enter the sender's phone number. Required; use 10–14 characters.
Email: Optionally enter the sender's email address.
Labels Tab
Set Mode to PDF, ZPL, or PNG.
Finalizing the Setup
Once you have entered the required information, click Save.

From the Carrier page, you can now see the Baseline Account listed with the status Active.

The Baseline Account is now connected. To start shipping, you must assign this connection to a specific Client by creating an Account as described below.
Configuring a Client Account
Adding an Account
Before adding a Client Account, ensure that the Client has been created. For instructions creating a Client, see: How to create a Client profile [Step-by-Step guide].
Click Clients from the left menu under the Clients section.
Click the Edit icon for the desired Client.

Click Add Accounts.

Optionally, use the Search box to search by Baseline Account Name or Carrier.
Select the Baseline Accounts that will serve as the foundation for your new Client Accounts.
Click Add Accounts.

A toast notification will confirm the accounts were successfully assigned. Click the Refresh icon if recently added accounts are not displayed.

Click Edit on each newly created account.
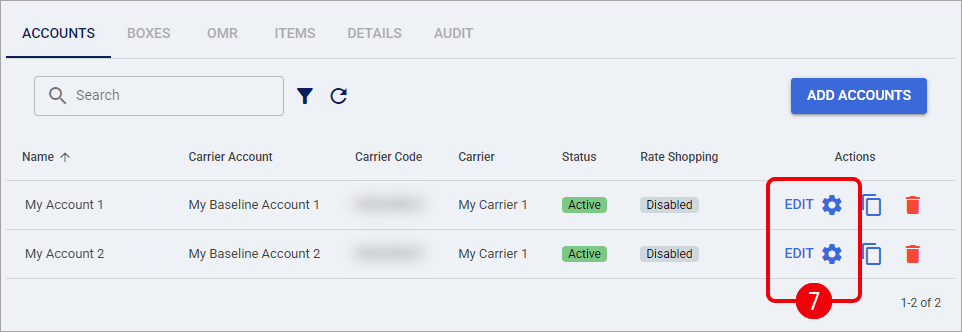
Configure the available options in each tab (except Carrier).

For complete instructions on configuring this settings, see How to configure the Billing Account General Options tab [Step-by-Step Guide].
Carrier Tab
The Carrier tab contains the Client Account fields used to define confirmed carrier-specific behavior for this client. Fields for GOFO are:
Service Code: Select the GOFO service to use for this client.
Override WMS Service Code: Enable this option to use the Client Account's service selection instead of the service code supplied by the WMS.
Entry port: Select the entry port confirmed with GOFO. An Entry port specified on the Order takes precedence over this setting.
Default contents description: Enter a fallback description for shipments. It is used when neither the package nor the Order supplies a contents description.
Sender address override: Configure client-specific sender information when shipments should use a different sender address from the Baseline Account.
Specifying Rate Shopping Service Codes
Optionally, if you are using Rate Shopping, you may need to restrict which services are included in the comparison.
For detailed instructions on how to configure this, see: Include or exclude Service Codes when Rate Shopping [Step-by-Step Guide].
Finalizing the Setup
Once you have entered the required information, click Save.

With the account configured and requirements verified, you can now proceed to process orders as described below.
Configuring an Order
The steps described in this section are not required for carrier setup, and they are offered as an optional review if further order-level configuration is required.
Follow the UI Navigation steps in How to Edit an Order [Step-by-Step guide], using the carrier-specific values provided in this guide.
The Carrier tab contains the GOFO-specific fields available when editing an Order. These fields define confirmed order-level behavior for the selected shipment:
Service Code: Select the GOFO service for the shipment.
Contents description: Enter a description of the shipment contents. A package-level description takes precedence; otherwise, this description is used before the Client Account's default contents description.
Entry port: Select the entry port for this shipment. This selection overrides the Client Account's Entry port.
Pickup date: Specify the shipment's pickup date. The pickup start and close times use the pickup date resolved by techSHIP.
Click Save to apply the order-level changes. After the Order is updated, continue with the standard shipping workflow.