How to Manage Customers and Suppliers: Create, Edit, Delete, and Import [Step-by-Step guide]
Last updated: September 29, 2026
You can use Customers and Suppliers in techOMS to quickly assign address and contact details to your Sales Orders and Purchase Orders.
This guide covers how to create, edit, delete, and import Customers and Suppliers.
 | For detailed conceptual information on how these master records and their references interact with orders, refer to Understanding Customers and Suppliers (Address Books) [Guide]. |
TABLE OF CONTENTS
- Access the Customers and Suppliers Pages
- Create a New Customer or Supplier
- Work with an Existing Customer or Supplier
Access the Customers and Suppliers Pages
| Make sure that you are operating at the right Account beforehand. |
To access the list pages, click Customers or Suppliers from the left menu under the Admin Settings section.

| These procedures require specific user permissions. Refer to techOMS User permissions structure [Information] to verify your access rights. |
Create a New Customer or Supplier
Your Customers and Suppliers can be created in three ways:
- Automatically, when creating Orders through the API (for Customers only).
- Via Import, by uploading a CSV file.
- Manually, using the techOMS interface.
Automatically (API-Based Creation)
Customers are created automatically when you create Sales Orders via the API.
| For more information about the API processes, see Getting started using techOMS API [Information]. |
Via Import
You can bulk-create Customers and Suppliers by importing them from a Comma Separated Value (CSV) file.
 | Before proceeding, ensure that your data matches the required schema described in the template available in techOMS Canonical Import Files [Information]. |
During the Import process:
- techOMS checks for duplicate records.
- When importing Customers or Suppliers, you can add up to 5 References Code/Value pairs to each record.
- If Use Ship To Address or Use Pickup Location is set to Yes, the existing Bill-To information (if any) is ignored and replaced with the corresponding Ship-To or Pickup fields.
- Countries must be in compliance with ISO 3166-2 (e.g., US for United States, CA for Canada).
- States must be in two-letter format (e.g., NY for New York, ON for Ontario).
To import your records:
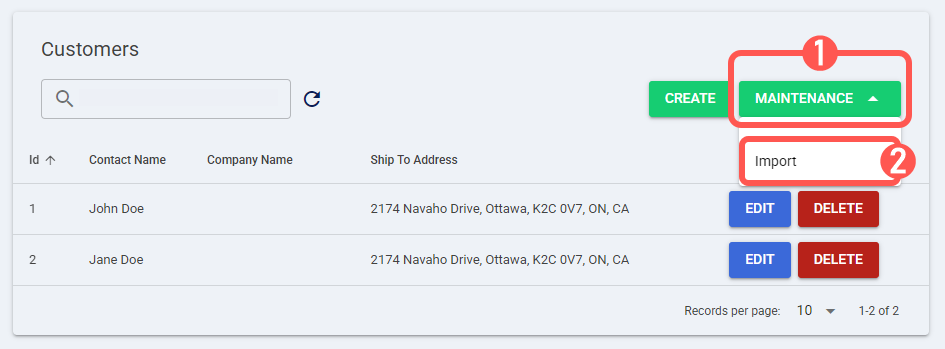
 | Click Maintenance. |
 | Click Import. |
 | Click Files to browse and select the CSV file. |
 | Click Import. |

The imported records will now be available for use in your techOMS workflows.
Manually
To manually create a new Customer or Supplier:
| Click Create. |

 | Enter the Contact Name and Company Name fields. |
 | Click the pencil icon in the primary address field (Ship To for Customers, or Pickup Location for Suppliers). |
In the pop-up dialog, enter the address and contact details.
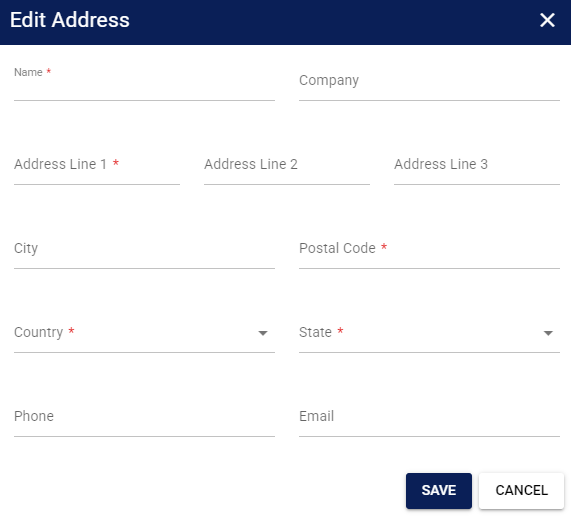
| While the Customer interface utilizes a Ship To designation, the Supplier interface utilizes a Pickup Location designation. The data entry process for both is identical. |
| techOMS supports US Military and Diplomatic addresses for Ship-To, Pickup Location, and Bill-To forms. These addresses are treated exclusively as US domestic shipments. When entering these addresses, you must format them according to USPS guidelines:
|
 | Define the Bill-To address by either: |
- Checking Use Ship To Address or Use Pickup Location, or
- Clicking the pencil icon in the Bill To field to manually enter the address and contact details.
| This is a separate dialog, but it has the same structure as the one used for the Ship To or Pickup Location addresses. |
| The Phone and Email fields are auto-populated from the Ship To or Pickup Location details. |
 | Press Save. |
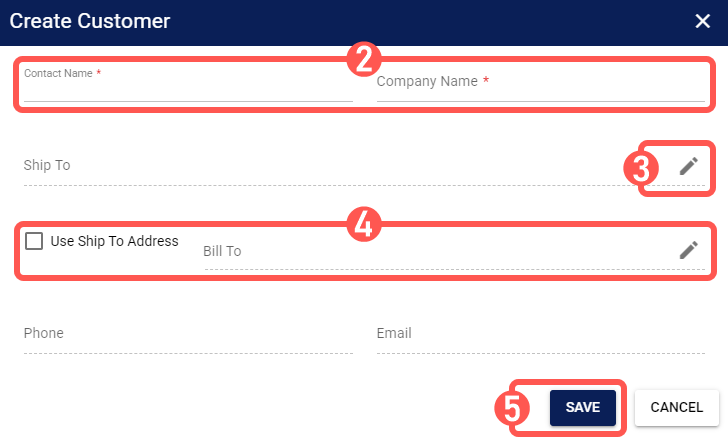
The record is now active and ready to be assigned to your Orders.
Work with an Existing Customer or Supplier
Before proceeding, use the Search bar to locate the desired record by searching for a Contact Name, Company Name, or Address.

| Changes to a Customer or Supplier will not affect existing Orders. Both edits and deletions apply only to future Orders that use this record. |
Edit a Customer or Supplier and its References
| Click Edit. |

 | Update the record fields as needed. |
 | Click Add, Edit, or Delete to manage your References as needed. |
When you add or edit a Reference, both Code and Value are required. Enter both fields, then click Save. If another Reference on the same Customer or Supplier already uses that Code, techOMS rejects the new Reference and does not save it.

 | Click Save. |

The record is now updated and will apply to all new Orders.
Delete a Customer or Supplier
| This action cannot be undone in techOMS. Proceed with caution. |
| Click Delete. |

 | Click OK. |

The record is now permanently deleted from your techOMS environment.