Techdinamics Support Portal – Customer User [Guide]
Last updated: November 18, 2026
Welcome to the Techdinamics Support Portal. This portal provides a centralized and convenient way to communicate with our Support team, submit new support requests, monitor the progress of existing tickets, and access helpful self-service resources.
This guide walks you through the main features of the portal, including how to create a detailed support ticket, select the appropriate priority, track and filter your requests, search the knowledge base, and contact Support through the chat widget. Following these recommendations will help our team understand your request and provide assistance more efficiently.
You can access the Techdinamics Support Portal at https://support.techdinamics.com.
TABLE OF CONTENTS
Portal Overview
The Issues workspace displays your support tickets. Open the help widget in the lower-right corner to search the knowledge base, start a chat, check service status, or submit product feedback.

Create a Support Ticket
Use a ticket when your request requires investigation, follow-up, or a documented resolution.
Select Create Ticket in the upper-right corner of the Issues page.
Select Create a Ticket from the drop-down menu.
Complete all required fields
Select Submit.
 | Before submitting a ticket, consider checking the knowledge base, you may find an existing solution there |
Complete the Ticket Form
Name and Email: Confirm your contact details. The email field may already be completed based on your account.
Subject: Enter a short and specific summary of the problem or request.
Type: Select the option that best describes your request.
Priority: Select the level that reflects the business impact and urgency of the request.
Product: Select the affected Techdinamics product or service.
Description: Explain the issue and include:
The business impact.
The expected result.
The actual result.
Steps to reproduce the issue.
Troubleshooting already attempted.
Relevant timestamps, including the time zone.
Affected users, accounts, orders, or shipments.
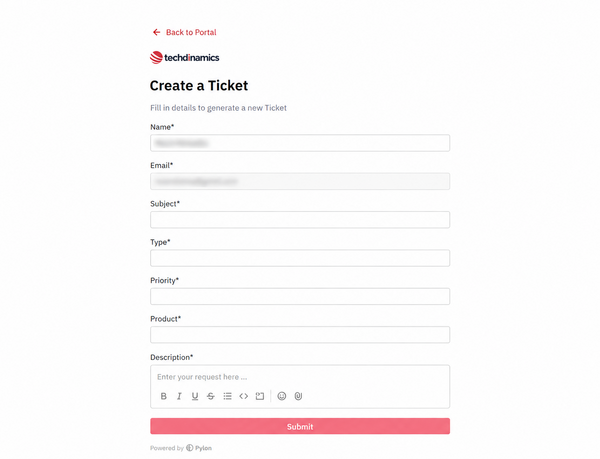
| Attach relevant screenshots, error messages, timestamps, affected order or shipment identifiers, and clear reproduction steps. |
 | Never include passwords, API secrets, authentication tokens, private keys, or other sensitive credentials in a support ticket. |
Priority Guidance
Ticket priority should be selected based on impact and urgency:
Urgent: A complete system outage or significant disruption to a critical business function, with no immediate workaround available.
High: Major functionality is severely impaired. Operations can continue in a restricted manner, and a temporary workaround may be available.
Medium: The issue affects a limited number of users or non-critical functionality, and a viable workaround is available.
Low: A minor issue or cosmetic defect that does not impact normal business operations.
For complete priority definitions and information about ticket types, see Tickets Types and Priority Levels.
| Techdinamics may review and adjust the selected priority when it does not accurately reflect the impact and urgency of the request. |
Reply to a Ticket
Open the ticket you want to update and enter your response in the Type your message here field. You can format the message, include links or attachments if needed. When your response is ready, click the Send button or press Ctrl + Enter.

Alternatively, you can reply directly to email notifications received from Techdinamics Support. Your response will automatically be added to the existing ticket conversation and will be visible in the Support Portal.
Track and Filter Tickets
The Issues page groups tickets by their current ownership or completion state.
On Techdinamics: Requests currently being handled within the Techdinamics support workflow.
On Customer: Requests awaiting information, confirmation, testing, or another action from the customer.
On 3rd Party: Requests that depend on action or investigation by an external party, such as a carrier or WMS provider.
On Hold: Requests temporarily paused by mutual agreement with the customer, with the next action scheduled for a specific future date or time.
Resolved: Requests for which a solution has been provided or the required work has been completed, pending customer confirmation or automatic closure.
Closed: Completed requests that are no longer active.

Use the available filters to locate a request:
Date: Adjust the reporting period.
Requester: Display tickets submitted by a specific requester.
Issue Status: Filter tickets by their current status.
Type: Filter tickets by request type.
Priority: Filter tickets by priority.
Product: Filter tickets by the affected product.
You can combine multiple filters to narrow the results. Use the search icon when you know part of the ticket title or identifier.

Light Mode
Use the theme icon in the upper-right corner to switch between light and dark modes based on your viewing preference.

Use the Help Widget
The help widget provides fast access to self-service content, chat, and important service links.
Knowledge Base: Type a question to find relevant help content before creating a ticket.
Start New Chat: Begin a conversation with our AI-powered Agent for immediate assistance. If additional help is needed, the conversation can be transferred to a member of our Support team.
Techdinamics Website: Open the Techdinamics website.
API Monitor - Service Status: Check current platform or API availability.
Feedback - Feature Request: Submit product feedback or a feature idea through the dedicated channel.
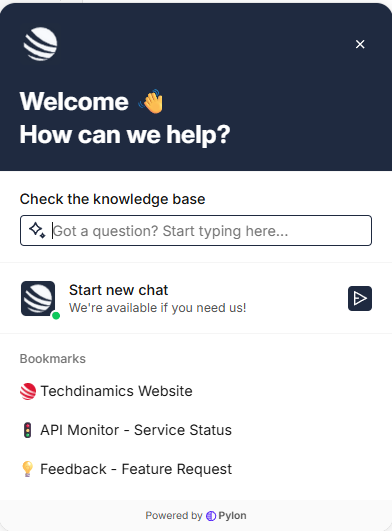
| Use tickets for issues that require tracking or investigation. Use chat for quick questions and guidance. Use the Feedback - Feature Request link for product ideas rather than reporting an incident. |
Start a Support Chat
When chat is available, select Start new chat and enter a concise description of what you need.
When starting a chat:
Briefly state your question or issue.
Include the affected product.
Explain the business impact.
Use the attachment icon to add a helpful screenshot or file.
Select the send button to begin the conversation.

Checking and Responding to Updates
You will receive an email notification when our Support team posts an update to your ticket.
You can review and respond to ticket updates in two ways:
By Email: Reply directly to the notification email. Your response will automatically be added to the existing ticket conversation.
Through the Support Portal: Sign in to the Support Portal, open the relevant ticket, review the latest updates, and submit your response.
Both methods maintain the communication history within the same ticket, allowing you to follow the conversation through the Support Portal.
Note: When responding by email, use Reply to the original ticket notification to ensure your message remains associated with the correct ticket.
Adding CCs to a Ticket
You can include additional contacts in ticket communications, including external parties, using either of the following methods:
Through the Support Portal: Open the relevant ticket and use the CC option to add additional contacts.
By Email: When replying to a ticket notification, add the desired recipients to the CC field of your email.
This allows you to involve other stakeholders in the conversation while keeping communications associated with the same support ticket.