How to Create and Set Up a Webhook [Step-by-Step Guide]
Last updated: November 2, 2026
Webhook notifications let techOMS send business event information to a receiving external system when configured events occur.
Use this guide to create a webhook for the selected Account and configure its destination, authentication, CSRF protection, payload signature, and custom request parameters.
Create and Configure a Webhook
To create and set up a Webhook, you will have to:
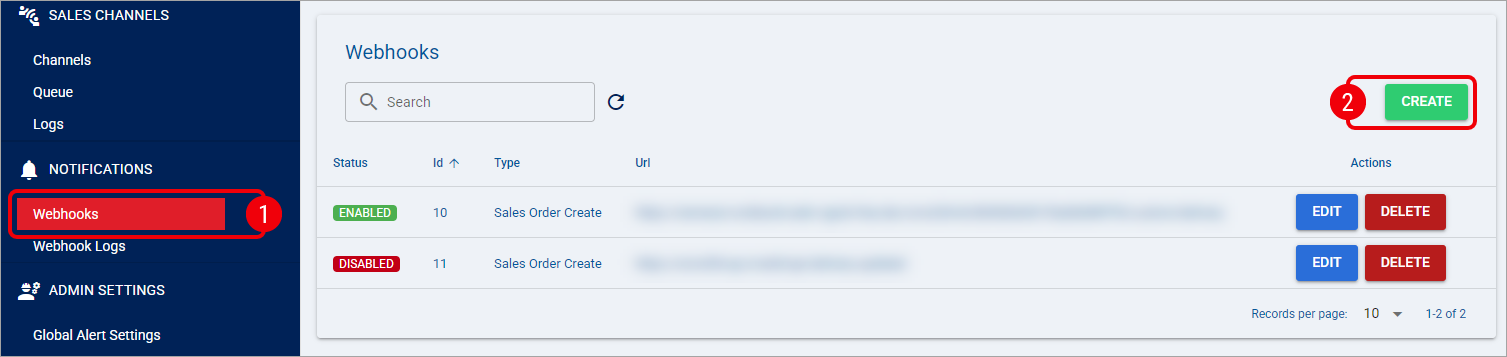
Click Webhooks under Notifications.
Click Create to deploy the fields for creation.
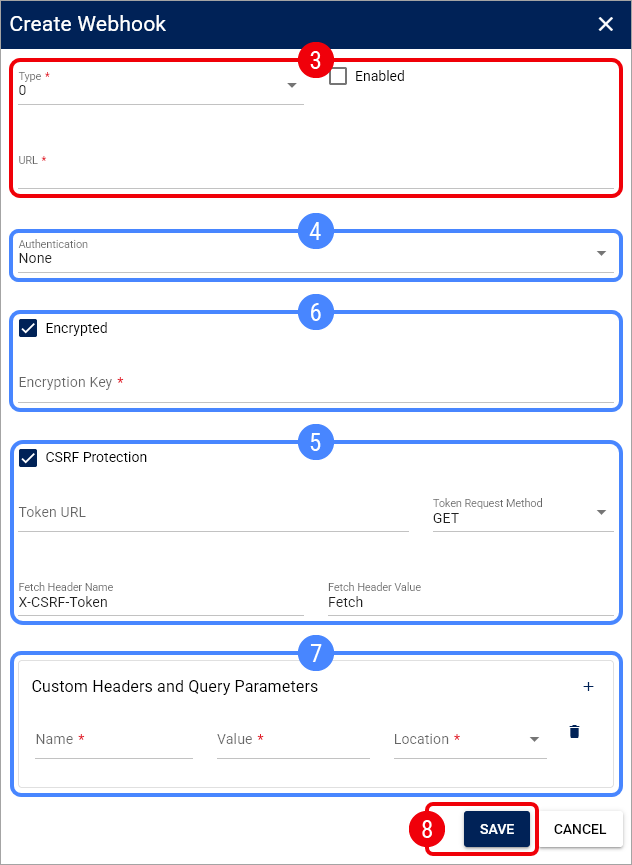
Complete the fields accordingly.
Enabled: Check to make the webhook active. Leave it unchecked if you want to save the webhook without enabling it yet.
Type: Select the business event that will generate the webhook notification.
URL: Enter the destination URL where techOMS will send the notification. The URL is required and must be an absolute HTTP or HTTPS URL.
Optionally, use Authentication to configure how techOMS authenticates requests to the receiving external system.
Select one of the following options:
None: Does not add dedicated authentication credentials.
API Key: Enter the required API Key Header and API Key.
Bearer token: Enter the Bearer Token supplied by the receiving system. techOMS uses the configured token directly and does not obtain or automatically refresh it.
Basic authentication: Enter the required Username and Password. The username cannot contain a colon (
:).
Authentication and CSRF Protection are independent settings and can be used together. When CSRF Protection is enabled, the selected authentication method is applied to both the CSRF token request and the webhook POST.
Optionally, check CSRF Protection when the receiving external system requires a CSRF token before accepting the webhook notification.
Configure the following fields:
Token URL: Enter the endpoint used to retrieve the CSRF token. If you leave this field empty, techOMS uses the webhook URL. If you enter a separate URL, it must use the same scheme, host, and effective port as the webhook destination.
Token Request Method: Select GET, HEAD, or OPTIONS. The default method is GET.
Fetch Header Name: Enter the header used to request, read, and send the CSRF token. The default is
X-CSRF-Token.Fetch Header Value: Enter the value sent when requesting the token. The default is
Fetch.
For each delivery attempt, techOMS requests a fresh token before sending the webhook. It reads the returned token from the response header specified by Fetch Header Name, sends the token in that same header with the webhook POST, and forwards applicable session cookies returned during the token request.
If token acquisition fails or does not return one valid token value, techOMS does not send the webhook POST for that attempt.
Optionally, check Encrypted and enter an Encryption Key to generate a signature for the webhook payload. This option does not encrypt the JSON payload sent to the receiving external system.
Optionally, expand Custom Headers and Query Parameters and use the
+control to add entries as needed.
For each entry, configure:
Name: Enter the header or query parameter name.
Value: Enter the value to send.
Location: Select Header or Query.
Use the delete control on a row to remove that entry.
Header entries are added to the outbound webhook request. When CSRF Protection is enabled, ordinary request headers are also applied to the token request. Query entries are appended to the webhook URL and, when applicable, to the token URL.
Do not use the reserved header names Host, Content-Length, Transfer-Encoding, or X-TechOMS-HMACSHA256-Signature. A custom Header also cannot duplicate the active authentication header or the configured CSRF header; these comparisons are case-insensitive.
Click Save to apply the changes.