How to Import Items for a Client from an XLSX File [Step-by-Step Guide]
Last updated: October 26, 2026
You can import an item table for a specific Client from a Microsoft Excel Spreadsheet (XLSX) file to immediately use them in techSHIP.
This guide covers the formatting requirements, validation rules, and the step-by-step process to successfully import items for a single client.
The XLSX file must be in the correct format with the correct columns. You can ensure this by exporting an items table to use it as a template, as detailed in 📄 How to Export Items for a Client to an XLSX File [Step-by-Step Guide].
Template Formatting and Data Rules
To ensure a successful import, your data must adhere to the following parsing and validation rules:
Included Columns: The import template includes all standard item fields, including the Container Type and Dangerous Goods Flag. It also includes Manufacturer Product Identifier and UPC, appended as the last two columns after Handling Group Code.
Blank Values: Blank cells are treated as unset (null) values. Fully blank rows are safely ignored by the system.
Boolean Formatting: Boolean (checkbox) fields accept multiple alphanumeric formats:
true / false,yes / no,y / n,1 / 0, orx.Decimal Formatting: Decimal values must use a period (
.) as the decimal separator. Ambiguous comma-formatted text will be rejected.Validation & Error Handling: The import process is strictly transactional. If a single row fails validation, the entire file is rejected to prevent partial imports. Error messages will detail the specific row, column, and invalid value (displaying up to 10 errors at a time).
Specific Field Constraints:
The SKU field is required and supports up to 255 characters.
Metal composition percentages (Aluminium, Copper, and Steel) must each be between 0 and 100, and their combined total cannot exceed 100.
Duplicate SKU values within the same import file are permitted.
Manufacturer Product Identifier and UPC are optional text fields, each supporting up to 255 characters. If either value exceeds this limit, techSHIP rejects the import and identifies the affected row and field in the validation error.
Handling Group: Use the Handling Group Code column to assign an Item to an existing active Handling Group for your current Location. Enter the group's code, not its display name. If the code is unknown, inactive, or unavailable for the current Location, techSHIP rejects the import instead of creating a Handling Group. If you need to create the group first, refer to 📄 How to Manage Handling Groups for Cartonization [Step-by-Step Guide].
When Replace Existing Items is enabled, leaving a Handling Group Code cell blank in a file where that column is present clears the Item's existing Handling Group assignment and leaves the Item Ungrouped. Leave the cell blank only when you intend to clear the assignment.
For detailed conceptual information and advanced configuration, refer to 📄 How to Use Cartonization [Guide].
To preserve leading zeros in Manufacturer Product Identifier and UPC, format the corresponding Excel cells as Text before entering or pasting the values. If Excel converts an identifier into a number and removes its leading zeros, changing the cell format afterward cannot reliably restore them.
During import, techSHIP reads the underlying cell values and trims leading and trailing whitespace from text values. Review the spreadsheet before importing to ensure the identifiers contain the intended values.
If you are creating or editing your import file using Microsoft Excel, you must ensure the CUSMA Certificate base64 string does not exceed Excel's cell character limit of 32,767. Attempting to save a file with a longer string in Excel will corrupt the data and cause the import to fail. The techSHIP import process itself can successfully handle longer base64 strings generated directly by a Host System.
If you need to import items for multiple clients simultaneously using a single file, you can use the centralized cross-client page. For detailed conceptual information and advanced configuration, refer to 📄 Global Item Maintenance: Managing Items Across Multiple Clients [Guide].
Import Procedure
To import an items table for a specific client from an XLSX file:
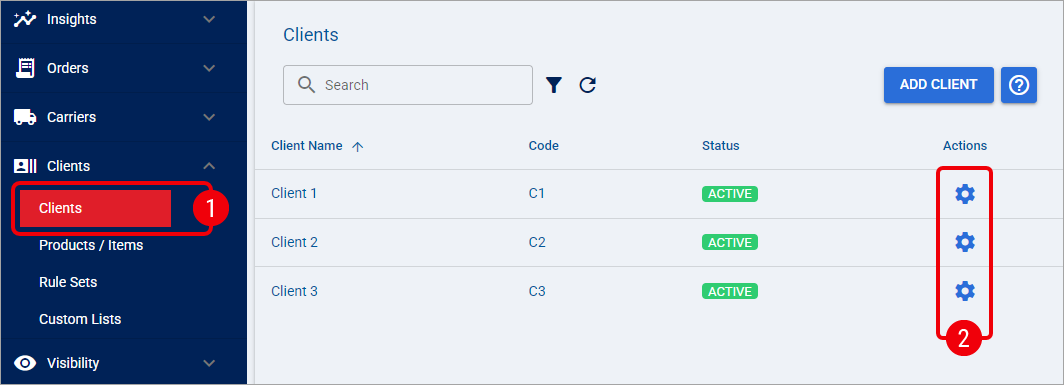
Find the desired client by clicking on Clients from the left menu under the Clients section.
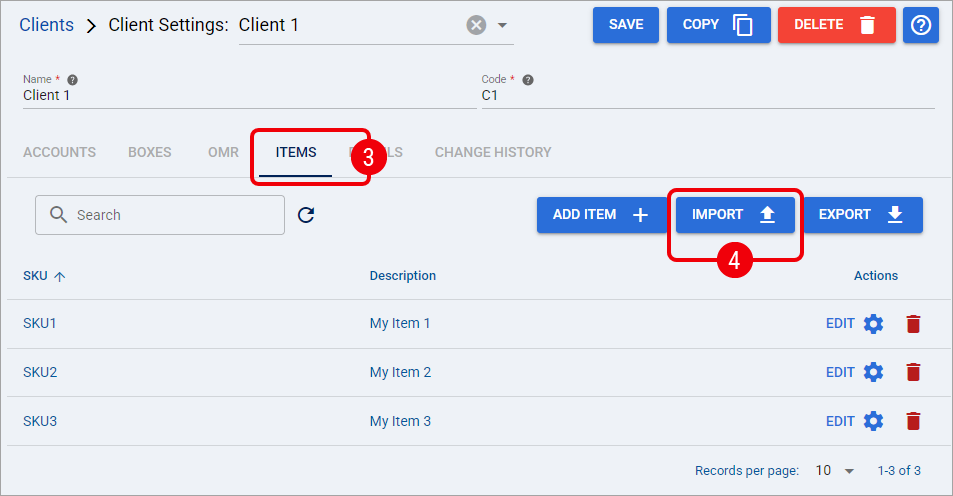
Edit the desired client by clicking the Settings button.
Click the Items tab.
Click Import.
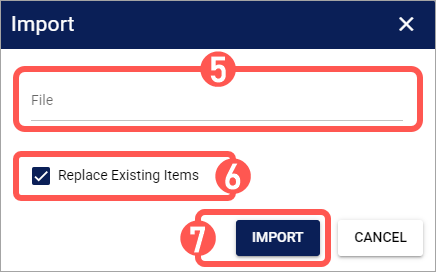
Click File to select the file you would like to import.
Set the Replace Existing Items checkbox according to your needs:
Checked: This removes the client's existing items and replaces them entirely with the file contents. Additionally, during a replacement import, a blank value in the file will actively clear an existing optional value for that field.
Unchecked: This adds the imported records to the current items table.
When leaving Replace Existing Items unchecked, the system does not check for any conflicts; ensure the imported records do not overlap with existing ones, as this may lead to unexpected behavior.
Click Import.
A toast notification will confirm the successful import, and the imported items will be immediately available.
If using Handling Groups and after the import completes, reopen the affected Item and verify that the Handling Group field shows the intended assignment. If you intentionally imported a blank Handling Group Code with Replace Existing Items enabled, verify that the Item is Ungrouped.
Imported Manufacturer Product Identifier and UPC values are stored in the client's item catalog. Importing or replacing catalog items does not retroactively overwrite identifiers already populated on existing order lines.
For details on when missing order-line identifiers can be populated from the catalog, refer to 📄 Understanding EU Product Identifiers in techSHIP [Information].