How to configure DHL Express (DHL) in techSHIP [Guide]
Last updated: October 28, 2026
DHL Express uses XML Services v10 through carrier code DHL. This configuration applies to the XML integration; the MyDHL REST integration uses DHLEXPRESSMYDHL.
This guide explains how to add and configure this carrier connection, review its available carrier-specific settings, and understand the shipment requirements and operational constraints that apply.
Carrier Requirements and Specifications
This section summarizes onboarding requirements and lists confirmed carrier-specific constraints.
To review all supported carriers and their specific requirements, see: 📄 techSHIP supported Carriers - Master List [Guides List].
Onboarding Requirements
The DHL Express integration supports:
Rate Shop
Tracking History, through techTRACK
3rd Party Billing
Label References
Dangerous Goods
Signature Required
Pickup Requests
Perishable Shipments
Shipment Insurance
Void, as a local order reset in techSHIP
Information to be Provided
Have the following credentials and account information available before configuring DHL Express:
DATA ELEMENT | SOURCE (HOW TO OBTAIN) |
|---|---|
Site Id | XML Services API identifier provided by DHL Express. |
Password | API password associated with the Site Id, provided by DHL Express. |
DHL Express account number | Shipping account details provided by your DHL Express representative. Confirm any separate freight or duty billing accounts. |
Sender address | Shipping or induction location, including company, street address, city, state/province where applicable, postal code, and country. |
Contact details | Contact name and phone number for the shipping location. |
Use the Site Id and its API Password, rather than credentials for the regular DHL Express customer portal.
For pickup requests, also have the location's preferred opening time, closing time, and preparation time available. Confirm eligibility for Paperless Trade, Dangerous Goods, and other additional services with DHL Express.
Specifications and Constraints
Operational Details
DHL Express supports domestic and international express shipping. It is a direct carrier integration: select its services using Service code. There are no consolidator split codes to configure.
Commercial Invoice (CI): For international dutiable shipments, DHL Express can generate the invoice when Skip trade documents is cleared. The invoice template controls its printed layout. Product identifiers are transmitted electronically with export lines regardless of the selected template.
Printed product identifiers: Select
COMMERCIAL_INVOICE_P_10in Commercial invoice template to display item identifiers on the invoice. The olderCOMMERCIAL_INVOICE_04template does not display them.EU consumer imports: For shipments processed from November 1, 2026, at 00:00 UTC, the integration checks product identifiers when generating export lines for a dutiable consumer shipment from a non-EU country to an EU member state, including Cyprus and Malta.
Required identifiers: Each item in scope must have a SKU and Manufacturer Product Identifier. Include UPC when available. A missing UPC is omitted without a placeholder.
Identifier length: Each identifier must contain no more than 35 characters, excluding leading and trailing spaces. An overlength SKU, Manufacturer Product Identifier, or UPC blocks label creation for shipments subject to the date-based check.
Other shipments and earlier processing: Blank or overlength identifiers are omitted, without truncation. Valid identifiers are included whenever export lines are generated, including before the enforcement date and outside EU consumer imports.
Contents description: Provide a contents description on the order, batch, or Client Account. Processing stops if all three are empty.
Voiding: Voiding resets the order and clears its labels in techSHIP. It does not submit a shipment-label cancellation to DHL Express. If the order has a pickup request, the integration also attempts to cancel that pickup.
Configuring a Baseline Account
A Baseline Account serves as the fundamental connection point between techSHIP and the carrier's system. It acts as a template that holds the credentials and fundamental properties required to process shipments.
The techSHIP AI Assistant is available from the Carrier page for supported Carrier configuration tasks. For detailed conceptual information and advanced configuration, refer to 📄 techSHIP AI Assistant: Overview & Availability [Information].
Adding a Carrier
Before adding an account, you must ensure the Carrier entity is available for your location.
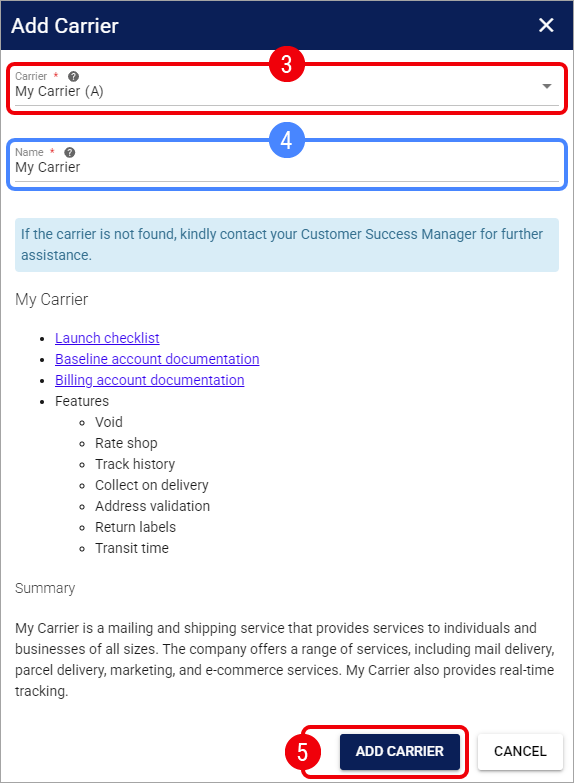
Click My Carriers from the left menu under the Carriers category.
Click Add Carrier.

Select the desired Carrier.
You may encounter additional messages depending on the carrier status or your plan:
Subscription Required (⭐): If the carrier has a star icon, you will see a message stating "To use this carrier, a subscription upgrade is required." Press Contact to Upgrade to proceed.

Carrier Suspended: If the carrier has not been used for an extended period, you will see a message stating “This carrier is currently on hold...” Click Request Assistance to reactivate it.

Setup Fee Waived: If a carrier from the same carrier group is already installed in your location, you can add this carrier without incurring additional fees.

If needed, update the carrier Name.
Click Add Carrier.
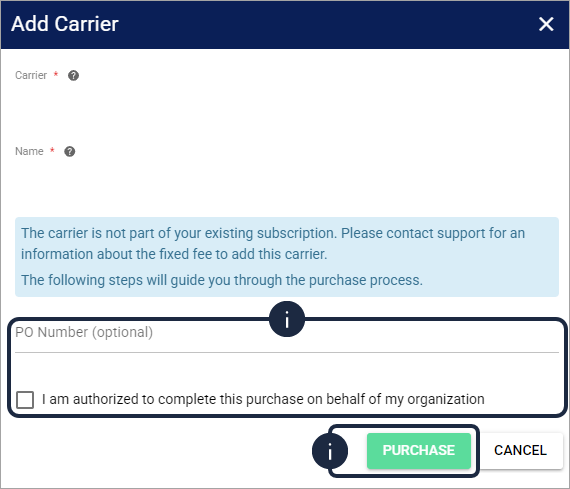
If the purchase confirmation appears, complete the following steps:
Review the purchase notice and any applicable charge information.
Optionally enter a PO Number.
Select I am authorized to complete this purchase on behalf of my organization.
Click Purchase to confirm the Carrier addition.
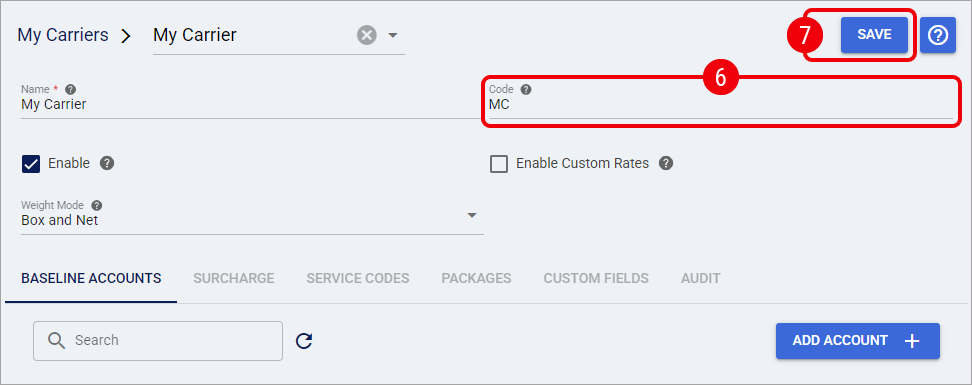
Once the Carrier is added, you will be automatically redirected to the Carrier page to continue setting it up.
Enter the Code of the Carrier as it appears in your host system.
The Code of the Carrier must match exactly the value defined in the host system. Any discrepancy (including casing or extra spaces) may prevent the carrier from working correctly.
Click Save.
If your facility utilizes the centralized Pickup Schedule, we highly recommend adding this new carrier to your calendar now. While not required to process labels, this ensures accurate induction metrics for your Insights dashboards. To learn more, see 📄 Understanding the Centralized Pickup Schedule & Expected Induction Logic [Information].
Adding a Baseline Account
From the Carrier page, click Add Account to create a new Baseline Account.

You will be redirected to the Baseline Account page to complete the setup.
Entering incorrect values will prevent the system from generating shipping labels.
General Tab
In the General tab, define the administrative properties:

Name: Enter a descriptive name for the account.
Enter a descriptive name based on unique properties. E.g.:
Carrier Name - Account Number (CarrierX - 123456789)
Carrier Name - Consolidator Name (CarrierY - MyConsolidator)
Carrier Name
Usage: Select the most suitable option:
Test: Used for sandbox or onboarding purposes.
Production: Used for live shipping.
Keep the Status field set to its default Active value. An account must be Active to remain fully editable. For detailed conceptual information on account statuses, refer to 📄 How to Inactivate and Activate a Carrier Baseline Account [Step-by-Step Guide].
Carrier Tab
Connection and Account Settings
Under Setup, configure:
Site Id: Enter the XML Services API identifier.
Password: Enter its associated API password.
Account #: Enter your DHL Express account number.
Account type: Select DHL for the standard account setup.
Contact Name and Contact Phone: Enter the shipping location's contact details. Complete Contact Phone Extension and Contact Email where applicable.
Request price breakup: Enable this when you need an additional breakdown of shipping charges, taxes, and surcharges. The additional carrier request can increase processing time.
Pickup Settings
Under Setup, configure the applicable scheduling defaults:
Pickup open time: Enter the location's opening time for pickups.
Pickup close time: Enter the location's closing time for pickups.
Pickup ready hours: Enter the preparation time, in hours, after opening.
Weekends Mode: Select Ignore weekends, Saturday and Sunday, or Sunday, according to which days are available for operation.
Default pickup instructions: Enter instructions to use when the order does not provide its own.
Sender Address
Under Sender address, complete Sender company, Address 1, City, Zip, and Country. Use Address 2 and State/province where applicable.
Select the applicable Region code for the shipping location: AM - Americas or EU - Europe.
Labels Tab
Supported formats: ZPL and PDF. Select the required format in Mode and the applicable label stock in Size.
Additional output settings are located in the Client Account's Carrier tab, under Options:
Print waybill: Enable requests the waybill; Disable does not request it. Auto requests it when the selected service does not report Paperless Trade support.
Add DHL logo on label: Enable this to request the carrier logo.
Tracking Number Mode: Select Default for piece tracking numbers or Airwaybill number to use the shipment airwaybill number.
Finalizing the Setup
Once you have entered the required information, click Save.

After you save the Baseline Account, check whether the Registration tab or a registration status badge is available.

If neither is available, the Carrier does not use this Registration workflow in techSHIP. If registration is still pending, open the Registration tab and press Registration, then complete 📄 How to Register a Carrier Baseline Account [Step-by-Step Guide] before creating shipments.
From the Carrier page, you can now see the Baseline Account listed with the administrative status Active. The Active status is separate from the account's registration status.

The Baseline Account configuration is now saved. You can continue with Configuring a Client Account below to assign the Baseline Account to a specific Client.
Configuring a Client Account
Adding an Account
Before adding a Client Account, ensure that the Client has been created. For instructions creating a Client, see: 📄 10 - How to create a Client profile [Step-by-Step guide].
Click Clients from the left menu under the Clients section.
Click the Edit icon for the desired Client.

Click Add Accounts.

Optionally, use the Search box to search by Baseline Account Name or Carrier.
Select the Baseline Accounts that will serve as the foundation for your new Client Accounts.
Click Add Accounts.

A toast notification will confirm the accounts were successfully assigned. Click the Refresh icon if recently added accounts are not displayed.

Click Edit on each newly created account.
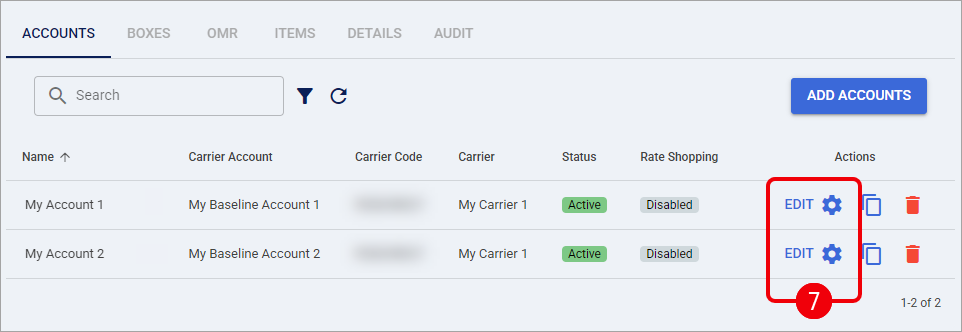
Configure the available options in each tab (except Carrier).

For complete instructions on configuring this settings, see 📄 How to configure the Billing Account General Options tab [Step-by-Step guide].
Carrier Tab
Service, Sender, and Billing
Under Service, configure:
Service code: Select a specific service, [Use Order] to retain the order's service, or [ECO] for Rate Shopping.
Override WMS Service Code: Enable this when the configured service must replace the service supplied by the Integrated system.
Sender name, Sender company, and Contact phone: Enter the sender and contact details used by this client.
Account number: Enter the shipper's DHL Express account number.
Shipper payment type: Select Shipper, Recipient, or Third Party according to who pays freight.
Billing account #: Enter the freight billing account.
Duty account #: Enter the applicable duty billing account.
Shipper id: Enter the shipper identifier associated with your DHL Express setup.
Registered account #: Complete this when a registered shipper account is required for your setup.
Shipper EORI number, Shipper tax number, and Shipper IOSS number: Complete the identifiers applicable to your shipment lanes.
Shipment and Customs Defaults
Under Options, configure:
Package type: Select the applicable packaging.
Currency code: Select the default shipment currency.
Default package description: Enter the contents description used when the order and batch do not provide one.
Is Dutiable: Enable this for international shipments requiring a customs declaration. The order's Dutiable selection can override this default.
Calculate insured value: Enable calculation of insured value from shipment line values when using carrier insurance.
Export reason code and Export reason: Set the default export reason and its description.
Terms of trade: Select the Incoterm applicable to this client's shipments.
Shipper type: Select the shipper's business classification. If no account or order value is set, the integration uses Business.
Receiver type: Select the recipient's classification. If no account or order value is set, the integration uses Direct consumer.
An explicit order-level Shipper type or Receiver type takes precedence over the corresponding Client Account setting. Direct consumer and Private are treated as consumer recipients for the EU product-identifier check. Classify the actual parties accurately.
Trade Documents and Notifications
Under Options, configure:
Skip trade documents: Enable this when carrier-generated trade documents are handled outside this integration. Electronic export-line identifiers are still included when an export declaration is generated.
Paperless trade: Select Enable, Disable, or Auto. Auto checks Paperless Trade availability for the selected service.
Duties & taxes prepaid: Enable the prepaid duties-and-taxes special service when applicable.
Commercial invoice template: Select the invoice layout. Use
COMMERCIAL_INVOICE_P_10when item product identifiers must appear on the printed invoice.Notify recipient by email: Enable carrier email notifications and complete Email text when a customized message is required.
Specifying Rate Shopping Service Codes
Specify which DHL Express services should be included or excluded from Rate Shopping.
For detailed instructions on how to configure this, see: Include or exclude Service Codes when Rate Shopping [Step-by-Step Guide].
Label References
DHL Express uses one order-label reference. Configure Reference 1 in the Client Account's General tab, under Labels. The other generic reference fields are not transmitted by this integration.
For a comprehensive guide on how to use label references, see: Using order References in your labels [Step-by-Step guide].
Finalizing the Setup
Once you have entered the required information, click Save.

With the account configured and requirements verified, you can now proceed to process orders as described below.
Configuring an Order
The steps described in this section are not required for carrier setup, and they are offered as an optional review if further order-level configuration is required.
Follow the UI Navigation steps in 📄 05 - How to edit an order’s information - [Step-by-Step guide], using the carrier-specific values provided in this guide.
Carrier Tab
Shipment Options
Under Options, review the shipment's Service code and applicable additional services:
Signature required and Indirect signature
Dangerous Goods (special service HE)
Perishable
Saturday delivery
Insurance, with Insured value and Insurance currency code when applicable
Request only services available for your account and shipment lane. Shipments requiring detailed dangerous-goods declarations also need the corresponding product or shipment-line dangerous-goods information.
For pickup requests, review Ready time, Pickup close time, Pickup door to type, and Pickup Instructions.
Commercial Invoice
Under Commercial invoice, review:
Currency code and Terms of trade for shipment-specific values.
Export reason code and Export reason when different from the Client Account defaults.
Shipper type and Receiver type for the actual shipment parties. Leave [Default: account settings] selected to use the Client Account classification.
Dutiable: Select [Default per client profile], Yes, or No to determine whether the international shipment is dutiable.
Contents description: Enter the shipment's contents.
Consignee tax ID, Consignee EORI, Shipper tax ID, Shipper EORI, and Shipper IOSS: Complete the applicable party identifiers.
ITN number: Enter the export filing number when required.
Commercial invoice remarks and Commercial invoice instructions: Enter the statements and instructions needed for the shipment.
Under Duty Billing, use Duty Payment Terms and Duty Account # when the shipment requires an override of the client's duty billing setup.
Item Product Identifiers
Before processing an applicable EU consumer import, review the following values on every shipment line:
TECHSHIP FIELD | PRODUCT IDENTIFIER |
|---|---|
SKU | Merchant Product Identifier: the seller's identifier for the product. |
Manufacturer Product Identifier | Non-standardized manufacturer identifier: the manufacturer's or supplier's own product, model, or part number. |
UPC | Standardized product identifier, when available. Preserve any leading zeros. |
Review Manufacturer Product Identifier and UPC in the shipment line's Additional Fields dialog. If these values originate in your Integrated system, ensure they are available on the corresponding shipment lines.
Supply the actual manufacturer identifier; do not copy the SKU into Manufacturer Product Identifier merely to populate the field. Products with different manufacturer identifiers or UPC values remain separate export lines even when they share the same SKU.
Click Save to apply the order-level changes. After the Order is updated, continue with the standard shipping workflow.
Troubleshooting
Authentication fails: Verify the Baseline Account's Site Id and Password against the XML Services credentials supplied by DHL Express. Regular customer-portal login credentials do not replace these values.
Missing or overlength product identifiers: From the enforcement date, the error identifies items with missing mandatory identifiers or values longer than 35 characters. Correct the affected shipment line's SKU, Manufacturer Product Identifier, or UPC before processing.
Business shipment treated as consumer: Check Receiver type on the order, then the Client Account. Select Business only when it matches the actual recipient. An explicit order selection takes precedence.
Identifiers do not appear on the invoice: Check Commercial invoice template in the Client Account's Carrier tab. Select
COMMERCIAL_INVOICE_P_10; the olderCOMMERCIAL_INVOICE_04layout does not print item references even when they are transmitted electronically.Commercial invoice is not generated: Check the order's Dutiable selection, the Client Account's Is Dutiable, and Skip trade documents. Carrier-generated invoices apply to international dutiable shipments.
Content description is mandatory: Complete Contents description on the order or provide the description on the batch or in Default package description on the Client Account.
ITN number is required: Complete ITN number on the order with the applicable export filing number when processing reports this requirement.
Processing slows after enabling price breakup: Review Request price breakup on the Baseline Account. The detailed charge breakdown requires an additional carrier request.