How to configure Canada Post (CANADAPOST) in techSHIP [Guide]
Last updated: October 28, 2026
This guide explains how to add and configure this carrier connection, review its available carrier-specific settings, and understand the shipment requirements and operational constraints that apply.
Carrier Requirements and Specifications
This section summarizes onboarding requirements and lists confirmed carrier-specific constraints.
To review all supported carriers and their specific requirements, see: 📄 techSHIP supported Carriers - Master List [Guides List].
Onboarding Requirements
The Canada Post integration supports:
Void
Rate Shopping
Time in Transit
Tracking History
Third-party billing through authorized account relationships
Collect on Delivery (COD)
Return Labels generated with outbound shipments
Label References
Signature Required
Proof of Age
Manifesting
Information to be Provided
Have the following credentials and account information available before setup. Conditional requirements are identified below.
DATA ELEMENT | SOURCE (HOW TO OBTAIN) |
|---|---|
Canada Post commercial parcel account | Obtain a commercial parcel agreement from Canada Post, including the Customer # and Contract id. Solutions for Small Business accounts are not supported by this integration. |
Canada Post username and password | Obtain access from the owner of the account being connected. These credentials are used to authorize merchant registration on the Canada Post website. |
Canadian induction address | Obtain the physical shipping origin from the warehouse or shipping team, including the company, street address, city, province, and postal code. |
Pickup or drop-off details | For pickup, obtain the pickup location's postal code. For drop-off, obtain the Shipping point id for the induction location from Canada Post. |
Billing and contact information | Confirm the payment method, sender contact phone, and refund contact email with the account owner. If using an alternate payer or mailing on behalf of another customer, obtain the customer numbers and confirm the arrangement with Canada Post. |
US shipment duties prepayment | For US shipments, obtain an approved Zonos Verified Account and account key, or an existing Zonos declaration for each package. The account owner obtains the key after account approval and payment setup. |
If Canada Post is not available when adding the Baseline Account, contact techSHIP Support to make the carrier available in your portal.
Specifications and Constraints
Operational Details
The integration processes small parcels originating in Canada, with domestic, US, and international destinations available according to the account agreement and selected service.
Manifesting: Complete the standard end-of-day manifest workflow for shipments that require a manifest. Canada Post supplies the manifest document. Use Transmit without manifest only for a workflow authorized by the carrier.
Commercial Invoice (CI): techSHIP retrieves this document when Canada Post returns it for the shipment. Review the available shipment documents and include the invoice when required for the selected service and destination.
Service eligibility: COD, signatures, proof of age, post-office delivery, and return labels depend on the selected service and account eligibility.
Customs information: For international shipments, provide the required item descriptions, quantities, values, weights, countries of origin, and HS codes through the Integrated system or the order's customs data.
Transit and tracking data: Transit estimates and tracking history are available when supplied by Canada Post.
Configuring a Baseline Account
A Baseline Account serves as the fundamental connection point between techSHIP and the carrier's system. It acts as a template that holds the credentials and fundamental properties required to process shipments.
The techSHIP AI Assistant is available from the Carrier page for supported Carrier configuration tasks. For detailed conceptual information and advanced configuration, refer to 📄 techSHIP AI Assistant: Overview & Availability [Information].
Adding a Carrier
Before adding an account, you must ensure the Carrier entity is available for your location.
Click My Carriers from the left menu under the Carriers category.
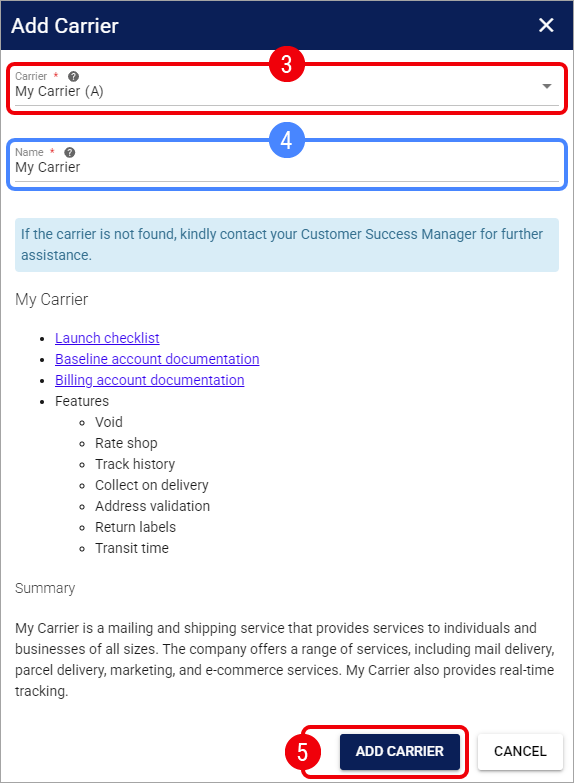
Click Add Carrier.

Select the desired Carrier.
You may encounter additional messages depending on the carrier status or your plan:
Subscription Required (⭐): If the carrier has a star icon, you will see a message stating "To use this carrier, a subscription upgrade is required." Press Contact to Upgrade to proceed.

Carrier Suspended: If the carrier has not been used for an extended period, you will see a message stating “This carrier is currently on hold...” Click Request Assistance to reactivate it.

Setup Fee Waived: If a carrier from the same carrier group is already installed in your location, you can add this carrier without incurring additional fees.

If needed, update the carrier Name.
Click Add Carrier.
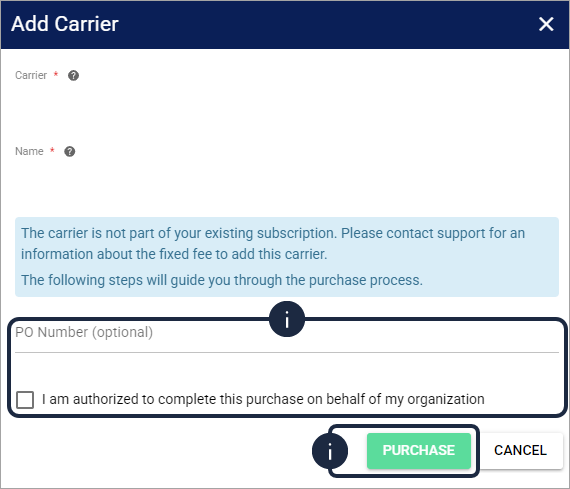
If the purchase confirmation appears, complete the following steps:
Review the purchase notice and any applicable charge information.
Optionally enter a PO Number.
Select I am authorized to complete this purchase on behalf of my organization.
Click Purchase to confirm the Carrier addition.
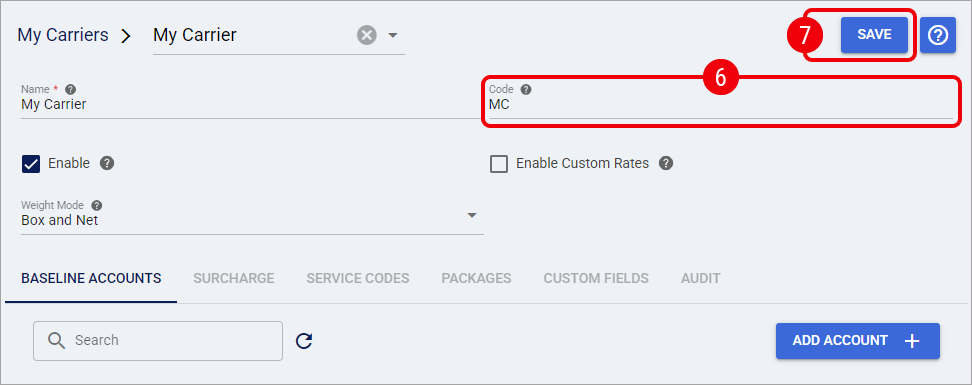
Once the Carrier is added, you will be automatically redirected to the Carrier page to continue setting it up.
Enter the Code of the Carrier as it appears in your host system.
The Code of the Carrier must match exactly the value defined in the host system. Any discrepancy (including casing or extra spaces) may prevent the carrier from working correctly.
Click Save.
If your facility utilizes the centralized Pickup Schedule, we highly recommend adding this new carrier to your calendar now. While not required to process labels, this ensures accurate induction metrics for your Insights dashboards. To learn more, see 📄 Understanding the Centralized Pickup Schedule & Expected Induction Logic [Information].
Adding a Baseline Account
From the Carrier page, click Add Account to create a new Baseline Account.

You will be redirected to the Baseline Account page to complete the setup.
Entering incorrect values will prevent the system from generating shipping labels.
General Tab
In the General tab, define the administrative properties:

Name: Enter a descriptive name for the account.
Enter a descriptive name based on unique properties. E.g.:
Carrier Name - Account Number (CarrierX - 123456789)
Carrier Name - Consolidator Name (CarrierY - MyConsolidator)
Carrier Name
Usage: Select the most suitable option:
Test: Used for sandbox or onboarding purposes.
Production: Used for live shipping.
Keep the Status field set to its default Active value. An account must be Active to remain fully editable. For detailed conceptual information on account statuses, refer to 📄 How to Inactivate and Activate a Carrier Baseline Account [Step-by-Step Guide].
Carrier Tab
Configure the connection and shared shipping settings on the Baseline Account's Carrier tab.
Sender Address and Induction
In Sender address, complete Sender company, Address 1, City, State/province, and Zip. Use Address 2 when needed. Set Country to Canada.
In Setup, configure the applicable induction method:
Pickup: Enable Shipments pickup indicator and enter the pickup location's postal code in Pickup postal.
Drop-off: Clear Shipments pickup indicator and enter the carrier-provided Shipping point id.
Use the location where the packages will enter the Canada Post network.
Merchant Registration
Select Save on the Baseline Account after entering the sender and induction details. The account must be saved before Register becomes available.
On the Carrier tab, select Register in Setup.
Review the registration form's sender and pickup or drop-off information, then select Register to continue to Canada Post.
Sign in with the Canada Post credentials for the account being connected and complete the authorization. When connecting a customer's account, use that customer's account credentials.
After returning to techSHIP, review the populated Public key, Secret key, Customer #, and Platform id in Setup.
Obtain the account's Contract id from the commercial agreement or Canada Post representative for the Client Account configuration.
US Shipment Setup
For US shipments using an account key, enter it in Zonos key under Setup. The associated Zonos Verified Account must be approved and have a valid payment method.
For the account setup process, see Integrate Zonos via API.
If a declaration has already been created for a package, enter its Declaration Id in that package's details as described in the order configuration. Each package must have its own declaration.
Request Limits per Minute
In Request limits per minute, configure at least 20 requests per minute for Shipment, Void, and Manifest. Rates is optional; if populated, configure at least 20 requests per minute.
Keep the configured values within the limits approved by Canada Post for the account.
Manifest and Refund Settings
Manifest address: Enable Same as sender address to use the Baseline Account's sender address. Otherwise, clear the option and complete the Canadian manifest address using Company, Address 1, Address 2 when needed, City, State/province, and Postal.
Transmit without manifest: Enable only when Canada Post has approved a workflow that transmits shipments as labels are created without a separate manifest close.
Contact email (for refunds): Enter the email address to use for shipment refund requests.
Labels Tab
Formats: PDF and ZPL labels are supported; PNG output is also available through techSHIP conversion. Labels measure 4 × 6 inches.
Use the Baseline Account's Labels tab for label output preferences.
PDF recovery: Disable PDF Label Recovery is located in the Baseline Account's Carrier tab, under Setup. Enable it only for a ZPL workflow; PDF label recovery is unavailable while it is enabled.
Return label printing: In the Client Account's Carrier tab, under Return, use Skip return labels printing to omit generated return labels when sending labels to a print client. Clear this option when return labels must be printed with the shipment.
Client Label Options
The following options are in the Client Account's Carrier tab, under Label:
Quick ship labels: Use for eligible domestic parcels that already display the recipient address and need an additional tracking label.
Show packing instructions: Include the carrier's packing instructions.
Show postage rate: Include the postage rate on the label.
Show insured value: Include the insured value on the label.
Substitute missing ship-to phone: Enable to supply a fallback when the recipient phone is missing, and enter the replacement number in Ship to phone.
Printed Sender Details
In the Client Account's Carrier tab, under Label from address, complete Sender name and Sender company.
To use a different printed sender address, enable Override label from address and complete Address 1, Address 2 when needed, City, State/province, and Zip. This changes the sender address used on the label; it does not change the configured induction location.
Finalizing the Setup
Once you have entered the required information, click Save.

After you save the Baseline Account, check whether the Registration tab or a registration status badge is available.

If neither is available, the Carrier does not use this Registration workflow in techSHIP. If registration is still pending, open the Registration tab and press Registration, then complete 📄 How to Register a Carrier Baseline Account [Step-by-Step Guide] before creating shipments.
From the Carrier page, you can now see the Baseline Account listed with the administrative status Active. The Active status is separate from the account's registration status.

The Baseline Account configuration is now saved. You can continue with Configuring a Client Account below to assign the Baseline Account to a specific Client.
Configuring a Client Account
Adding an Account
Before adding a Client Account, ensure that the Client has been created. For instructions creating a Client, see: 📄 10 - How to create a Client profile [Step-by-Step guide].
Click Clients from the left menu under the Clients section.
Click the Edit icon for the desired Client.

Click Add Accounts.

Optionally, use the Search box to search by Baseline Account Name or Carrier.
Select the Baseline Accounts that will serve as the foundation for your new Client Accounts.
Click Add Accounts.

A toast notification will confirm the accounts were successfully assigned. Click the Refresh icon if recently added accounts are not displayed.

Click Edit on each newly created account.
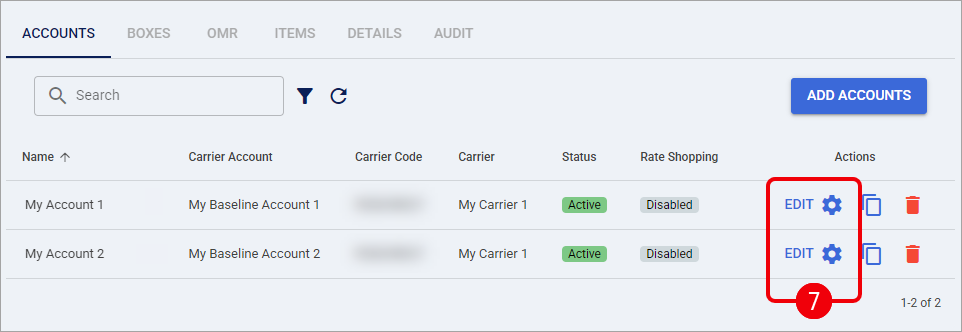
Configure the available options in each tab (except Carrier).

For complete instructions on configuring this settings, see 📄 How to configure the Billing Account General Options tab [Step-by-Step guide].
Carrier Tab
Configure the following client-specific settings on the Client Account's Carrier tab.
Service and Billing
In Service, configure:
Customer #: Review the customer number inherited from the Baseline Account. This field is read-only.
Contract id: Enter the commercial parcel contract associated with the account.
Method of payment: Select Account or Credit card, according to the account's billing arrangement.
Mailed on behalf customer #: Enter the authorized customer number when mailing on behalf of another customer.
Paid by customer #: Enter the authorized payer's customer number when charges must be assigned to a different payer.
Contact phone: Enter the sender's contact phone number.
Service code: Select [Use Order] to use the order's service, [ECO] to choose the lowest available rate, or a specific Canada Post service.
Override WMS Service Code: Enable when the selected Client Account service should replace the service supplied by the Integrated system.
Cost centre: Enter a cost-centre value when required for the account's shipment allocation.
Confirm alternate payer and mail-on-behalf arrangements with Canada Post before using them.
Delivery and Manifest Preferences
The following settings are also in Service:
Default Delivery: Select the default delivery handling for the Client Account. An order can specify its own delivery option.
Non-delivery handling: Select the applicable handling for undeliverable shipments.
Notify recipient by email: Enable carrier email notifications when required for the shipping workflow.
Proof of age 18, Proof of age 19, and Proof of age 21: Select Default to use the order's setting. Enable or Disable applies that choice to orders processed with this Client Account.
Manifest level: Select Summary or Detail for the carrier's manifest.
International Shipment Defaults
In Service, configure the applicable international settings:
Reason for export: Select the purpose of the shipment.
IOSS number: Enter the applicable IOSS identifier. An order-specific value takes precedence when supplied.
Currency code: Set the currency used for the customs values.
Use current CAD exchange rate for customs if not specified in order: Enable to obtain the rate from CAD to the selected customs currency when the order does not provide one. For non-CAD customs values, supply the order's Currency conversion factor or enable this option.
Province of origin: Set the province used for goods whose country of origin is Canada.
Return Labels
In Return, configure:
Generate return labels: Enable to request return labels with outbound shipments.
Return notification email: Enter the email address for return notifications.
Override return address: Enable to use a different return address. Complete Return name, Return company, Address 1, Address 2 when needed, City, State/province, and Zip.
When Override return address is disabled, the return address comes from the Baseline Account's sender address. Use a Canadian return address and a service eligible for return labels.
The order's Print return labels setting can override Generate return labels.
Specifying Rate Shopping Service Codes
Configure service inclusion or exclusion rules in the Client Account's Rates & Markups tab, using Service Filters. Use these rules to limit the services considered for Rate Shopping.
For detailed instructions on how to configure this, see: Include or exclude Service Codes when Rate Shopping [Step-by-Step Guide].
Label References
Canada Post supports two label references. Configure Reference 1 and Reference 2 in the Client Account's General tab, under Labels.
Each reference supports up to 35 characters. Enable Allow reference truncation to shorten longer reference values to that length. Reference 3 and Reference 4 are not transmitted by this integration.
For a comprehensive guide on how to use label references, see: Using order References in your labels [Step-by-Step guide].
Finalizing the Setup
Once you have entered the required information, click Save.

With the account configured and requirements verified, you can now proceed to process orders as described below.
Configuring an Order
The steps described in this section are not required for carrier setup, and they are offered as an optional review if further order-level configuration is required.
Follow the UI Navigation steps in 📄 05 - How to edit an order’s information - [Step-by-Step guide], using the carrier-specific values provided in this guide.
Carrier Tab
Use the order's Carrier tab to set shipment-specific options.
Options
Service code: Select the service for the order when the Client Account uses the order's service.
COD amount: Enter the amount to collect. Select the accepted payment type in COD Method and enable COD includes shipping cost when shipping charges must be included.
Default Delivery: Select the delivery handling for this shipment. When selecting Deliver to post office, enter Post office id, provide the recipient's name, phone, and email, and enable Notify recipient by email on the Client Account.
Print return labels: Select Enable or Disable to override the Client Account, or Default to follow its Generate return labels setting.
IOSS number: Enter an order-specific identifier when applicable.
Currency code and Currency conversion factor: Provide the customs currency and the exchange rate from CAD to that currency when needed.
Confirmation
Signature required: Request a signature for an eligible service.
Proof of age 18, Proof of age 19, and Proof of age 21: Select the applicable age-verification requirement. These settings apply when the corresponding Client Account preference is Default.
Add declared value: Enable when requesting declared-value coverage for the shipment.
Packaging
Set Oversize, Unpackaged, and Mailing tube to match the package and the selected service's requirements.
Packages Tab
For a US package with a declaration that was created in advance:
Open the order's Packages tab.
Select the package's pencil action, Package Details.
Enter the package's Declaration Id.
Select Save in the package dialog.
Use the declaration associated with that package.
Click Save to apply the order-level changes. After the Order is updated, continue with the standard shipping workflow.
Troubleshooting
Registration ends on a 404 page: Reopen the Baseline Account's Carrier tab and check whether Public key, Secret key, Customer #, and Platform id were populated. If registration is incomplete, provide techSHIP Support with the error and the stage at which it occurred.
A Canadian shipment is treated as international: Check the Baseline Account's Carrier tab, under Sender address, and set Country to Canada. Existing accounts with a blank country must be corrected and saved.
Pickup, drop-off, or origin details are rejected: In the Baseline Account's Setup, verify Shipments pickup indicator and its corresponding Pickup postal or Shipping point id. Confirm the sender and destination postal codes match their addresses.
US label creation fails: Confirm the Zonos key belongs to an approved account with a valid payment method, or verify the package's existing Declaration Id. Review the shipment's required customs data.
Non-CAD customs values cannot be processed: Supply Currency conversion factor on the order's Carrier tab, or enable Use current CAD exchange rate for customs if not specified in order on the Client Account.
PDF labels are unavailable: Check Disable PDF Label Recovery in the Baseline Account's Carrier tab, under Setup. Clear it if the workflow requires PDF label recovery.
Return labels are missing: Check Generate return labels on the Client Account and Print return labels on the order. Verify the return address and selected service are eligible for the return-label workflow. If return labels were generated but not printed, clear Skip return labels printing on the Client Account.
A transmitted shipment cannot be voided directly: A shipment that has already been transmitted may require a refund request to Canada Post. Verify Contact email (for refunds) on the Baseline Account and review the carrier's response; a refund request does not guarantee approval.
Manifest close fails: Review the carrier's returned error and verify the account's induction details, Contract id, and payer configuration. If the error persists, provide techSHIP Support with the manifest number and the returned error.
The carrier reports
Rejected by SLM Monitor: Compare Request limits per minute on the Baseline Account with the limits authorized by Canada Post and adjust the affected request category accordingly.