How to configure FedEx Freight (FEDEXFREIGHTREST) in techSHIP [Guide]
Last updated: October 30, 2026
FedEx Freight (FEDEXFREIGHTREST) uses the REST integration. The legacy SOAP integration uses the separate code FEDEXFREIGHT.
This guide explains how to add and configure this carrier connection, review its available carrier-specific settings, and understand the shipment requirements and operational constraints that apply.
Carrier Requirements and Specifications
This section summarizes onboarding requirements and lists confirmed carrier-specific constraints.
To review all supported carriers and their specific requirements, see: 📄 techSHIP supported Carriers - Master List [Guides List].
Onboarding Requirements
The FedEx Freight integration supports:
Rate Shopping
Time in Transit, when returned by FedEx
Tracking History
Third-Party Billing
Collect freight billing
Address Validation, including residential classification
Label References
Signature Required, subject to the selected service
Dangerous Goods, subject to the applicable service, account enablement, and shipping requirements
Return shipments, using the applicable shipping origin and freight billing information
Freight Direct
Void, subject to carrier acceptance
Information to be Provided
Gather the following information before configuring FedEx Freight:
DATA ELEMENT | SOURCE (HOW TO OBTAIN) |
|---|---|
FedEx account number | Obtain from the account owner. Identify the account used for the REST connection and the freight account used for billing. |
Account holder name and registered address | Obtain from the account owner or FedEx. Registration information must match the account records held by FedEx. |
Account verification information | The account owner must be able to complete the authentication method offered during registration, such as PIN or invoice verification. |
Freight billing information | Obtain the freight account number, billing name, company, address, and applicable contact details from the account owner or FedEx. Obtain alternate billing details when another freight billing party will be used. |
Shipping origin and contact information | Provide the warehouse address, sender name, company, phone number, and email address. |
REST API credentials, when using your own API key | Obtain the API key and secret for the customer's FedEx API project. These are used instead of credentials generated through registration. |
Obtain the warehouse opening and closing times, preparation time in hours, and existing pickup arrangement when configuring shipment readiness.
For shipments requiring NMFC information, obtain the correct NMFC code from the shipper. Preserve any required leading zeros and item suffix. International and dangerous-goods shipments also require the information and authorization applicable to their service and shipment lane.
Specifications and Constraints
Operational Details
FedEx Freight is a direct carrier integration supporting freight services, including FedEx Freight Priority, FedEx Freight Economy, and the Express Freight services available through the integration. These are service selections within the same plugin. Availability depends on the account, origin, destination, shipment details, and requested accessorials.
Freight classification: Package-level freight class takes precedence over the Client Account's Freight class. If neither is provided, the integration can calculate a class from package weight and dimensions.
Commodity details: Supply package weights, dimensions, quantities, and commodity descriptions. Default package description supplies the description when a package does not provide one.
NMFC information: The Order's Freight NMFC class takes precedence over the Client Account's NMFC class. The selected value is used for the shipment's freight line items. If both fields are blank, no NMFC code is supplied. NMFC configuration does not replace freight-class configuration.
Pickup arrangements: Selecting a pickup arrangement or entering pickup times does not book a pickup. Arrange pickups directly with FedEx Freight unless an existing recurring arrangement already covers the shipment.
Return freight: Configure the actual return origin, destination, and freight billing party. A separate return shipment is distinct from automatically adding a return label to an outbound shipment.
Bill of Lading (BOL): Applicable freight shipments return a carrier-generated BOL in PDF format on letter-size paper. The configured NMFC code can populate its NMFC rows. Review the freight class, NMFC code, commodity information, and billing details before tendering the freight.
Commercial Invoice (CI): International shipments may require a CI and additional customs documents. The BOL workflow requests a freight BOL separately from shipping labels; it must not be treated as confirmation that a CI was generated. The integration can also handle carrier-returned CI documents for applicable international shipment workflows. Confirm the documents returned for the selected service and provide any additional documents required for the lane.
Configuring a Baseline Account
A Baseline Account serves as the fundamental connection point between techSHIP and the carrier's system. It acts as a template that holds the credentials and fundamental properties required to process shipments.
The techSHIP AI Assistant is available from the Carrier page for supported Carrier configuration tasks. For detailed conceptual information and advanced configuration, refer to 📄 techSHIP AI Assistant: Overview & Availability [Information].
Adding a Carrier
Before adding an account, you must ensure the Carrier entity is available for your location.
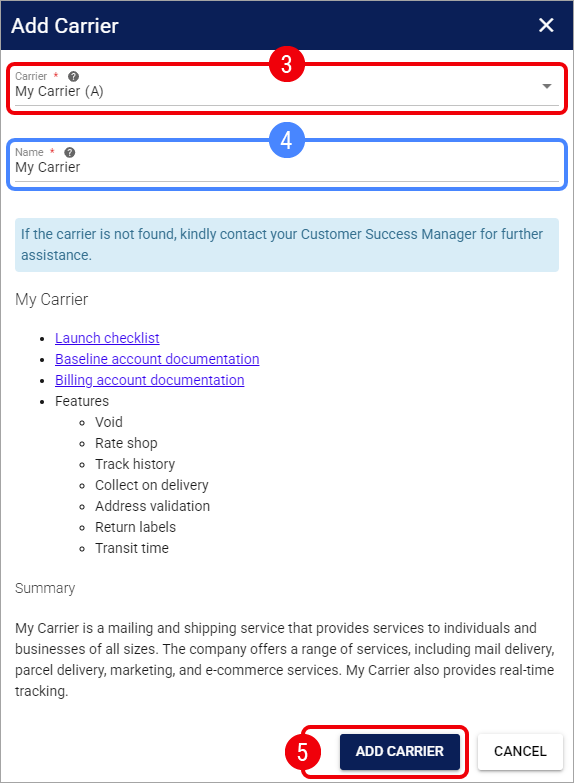
Click My Carriers from the left menu under the Carriers category.
Click Add Carrier.

Select the desired Carrier.
You may encounter additional messages depending on the carrier status or your plan:
Subscription Required (⭐): If the carrier has a star icon, you will see a message stating "To use this carrier, a subscription upgrade is required." Press Contact to Upgrade to proceed.

Carrier Suspended: If the carrier has not been used for an extended period, you will see a message stating “This carrier is currently on hold...” Click Request Assistance to reactivate it.

Setup Fee Waived: If a carrier from the same carrier group is already installed in your location, you can add this carrier without incurring additional fees.

If needed, update the carrier Name.
Click Add Carrier.
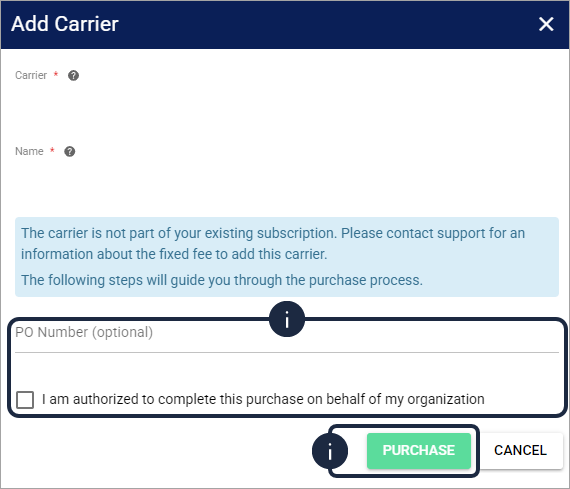
If the purchase confirmation appears, complete the following steps:
Review the purchase notice and any applicable charge information.
Optionally enter a PO Number.
Select I am authorized to complete this purchase on behalf of my organization.
Click Purchase to confirm the Carrier addition.
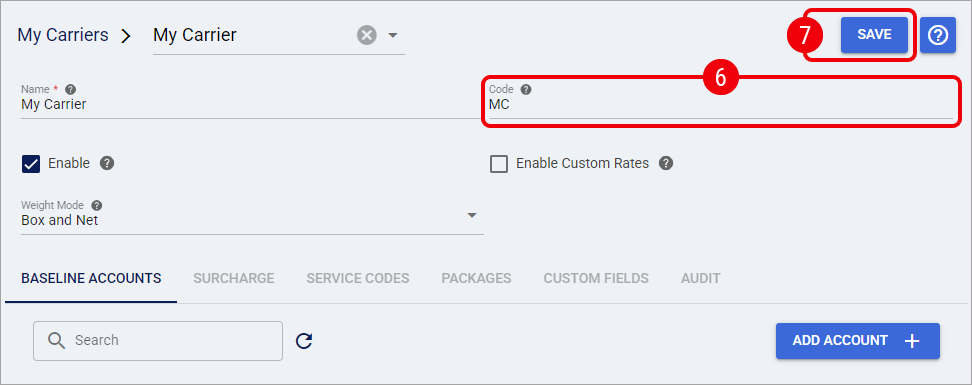
Once the Carrier is added, you will be automatically redirected to the Carrier page to continue setting it up.
Enter the Code of the Carrier as it appears in your host system.
The Code of the Carrier must match exactly the value defined in the host system. Any discrepancy (including casing or extra spaces) may prevent the carrier from working correctly.
Click Save.
If your facility utilizes the centralized Pickup Schedule, we highly recommend adding this new carrier to your calendar now. While not required to process labels, this ensures accurate induction metrics for your Insights dashboards. To learn more, see 📄 Understanding the Centralized Pickup Schedule & Expected Induction Logic [Information].
Adding a Baseline Account
From the Carrier page, click Add Account to create a new Baseline Account.

You will be redirected to the Baseline Account page to complete the setup.
Entering incorrect values will prevent the system from generating shipping labels.
General Tab
In the General tab, define the administrative properties:

Name: Enter a descriptive name for the account.
Enter a descriptive name based on unique properties. E.g.:
Carrier Name - Account Number (CarrierX - 123456789)
Carrier Name - Consolidator Name (CarrierY - MyConsolidator)
Carrier Name
Usage: Select the most suitable option:
Test: Used for sandbox or onboarding purposes.
Production: Used for live shipping.
Keep the Status field set to its default Active value. An account must be Active to remain fully editable. For detailed conceptual information on account statuses, refer to 📄 How to Inactivate and Activate a Carrier Baseline Account [Step-by-Step Guide].
Carrier Tab
Connection and Registration
Account #: Enter the FedEx account number used for the connection.
Register: On a saved Baseline Account, complete the FedEx registration process. Accept the license agreement, enter the account information, and complete the verification method offered by FedEx.
Own API key: Enable this option when using the customer's own REST API credentials.
User key and User password: For an own-key connection, enter the API key and secret. For a registered connection, use the credentials generated through registration.
Enter the registration name and address exactly as recorded by FedEx. Keep this information separate from the physical warehouse origin and the freight billing address.
Shipping Origin and Pickup Arrangement
Configure the warehouse origin in Sender address.
FIELD | CONFIGURATION |
|---|---|
Pickup mode | Select the arrangement that applies to the account. Dropoff at FedEx location identifies a dropoff; Scheduled pickup identifies an existing recurring arrangement; Contact fedex to schedule requires arranging the pickup directly with the carrier. These choices do not create a pickup booking. |
Contact name | Enter the warehouse contact. |
Pickup open time and Pickup close time | Enter the warehouse availability window used in shipment-readiness calculations. |
Pickup ready hours | Enter the preparation time in hours. |
Weekends mode | Select how weekends are handled when calculating the shipment date. |
Order or batch dates can take precedence over the account's calculated date. Pickup times describe shipment readiness; they do not constitute a carrier pickup confirmation.
Rate Validation
Use Quote vs shipping rate validation to control discrepancies between a previously fetched quote and the processed shipment charge:
Detect any discrepancy: Check differences in either direction.
Detect shipping overcharge: Check whether the processed charge exceeds the quote.
Detect shipping overcharge greater than 10 cents: Apply the configurable maximum-discrepancy check. Set Max rate discrepancy to the permitted difference; the option's displayed name does not replace this field.
None: Disable these discrepancy checks.
The check applies when a previously fetched quote is available for the processed service and Client Account.
Retry Policy
Transient error retry count: Set the number of retries for recognized temporary carrier errors. Retries are disabled unless configured; the supported maximum is five.
Retry delay (ms): Set the delay before the first retry in milliseconds. Later retries increase the delay. A blank value uses 1,000 milliseconds.
Transient error codes: Enter the carrier error codes to retry, separated by commas. A blank value uses
SYSTEM.UNEXPECTED.ERROR.
The retry policy applies to recognized carrier error responses. It does not automatically retry every failure, timeout, or connection error.
Labels Tab
Formats: The integration handles ZPL, PDF, and PNG shipping labels.
Configure Mode, Size, and Orientation for the required output. Standard label-stock mappings include 4 × 6, 4 × 6.75, and 4 × 8 inches. Select stock compatible with the service, output format, and printer.
Printed sender information: The Client Account's Carrier tab includes Override label from address. Use it when the sender information printed on the label must differ from the physical shipping origin, and complete the corresponding name, company, address, phone, and email fields. This is separate from Override sender address, which changes the shipment origin.
The BOL remains a separate PDF document regardless of the thermal shipping-label format.
Finalizing the Setup
Once you have entered the required information, click Save.

After you save the Baseline Account, check whether the Registration tab or a registration status badge is available.

If neither is available, the Carrier does not use this Registration workflow in techSHIP. If registration is still pending, open the Registration tab and press Registration, then complete 📄 How to Register a Carrier Baseline Account [Step-by-Step Guide] before creating shipments.
From the Carrier page, you can now see the Baseline Account listed with the administrative status Active. The Active status is separate from the account's registration status.

The Baseline Account configuration is now saved. You can continue with Configuring a Client Account below to assign the Baseline Account to a specific Client.
Configuring a Client Account
Adding an Account
Before adding a Client Account, ensure that the Client has been created. For instructions creating a Client, see: 📄 10 - How to create a Client profile [Step-by-Step guide].
Click Clients from the left menu under the Clients section.
Click the Edit icon for the desired Client.

Click Add Accounts.

Optionally, use the Search box to search by Baseline Account Name or Carrier.
Select the Baseline Accounts that will serve as the foundation for your new Client Accounts.
Click Add Accounts.

A toast notification will confirm the accounts were successfully assigned. Click the Refresh icon if recently added accounts are not displayed.

Click Edit on each newly created account.
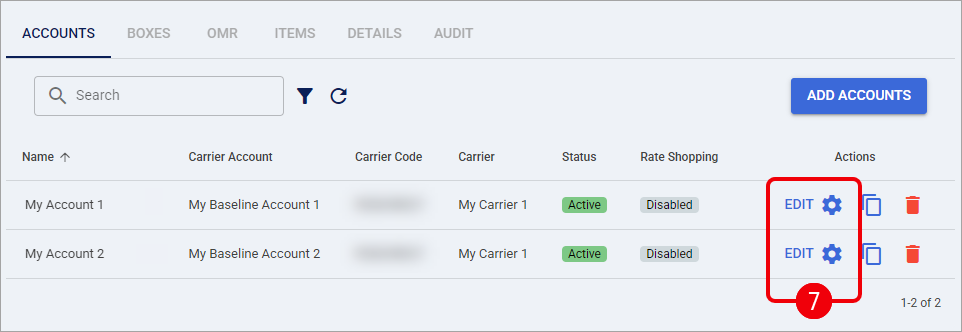
Configure the available options in each tab (except Carrier).

For complete instructions on configuring this settings, see 📄 How to configure the Billing Account General Options tab [Step-by-Step guide].
Carrier Tab
Service, Payment, and Freight Details
FIELD | CONFIGURATION |
|---|---|
Service code | Select the service for the Client Account, or retain the order-provided service when appropriate. |
Override WMS Service Code | Enable this option to replace the service received from the Integrated system with the account's selected service. |
Payment type | Select the party responsible for freight charges. Sender, Third party, Recipient, and Collect represent different billing arrangements; select the arrangement authorized for the account. |
Payor Account # | Enter the account to charge when required by the selected Payment type. |
Payor country | Select the country associated with the payor account. |
Default third party postal and country | Allow the account's country to supply missing third-party country information in the applicable order override. This does not replace the need for a valid billing account and address. |
Currency code | Select the transaction currency. |
Allow currency conversion | Allow shipment-charge conversion where applicable to the selected service and the exchange-rate information returned by FedEx. Some freight services already permit conversion independently of this setting. |
Package type | Select the packaging applicable to the shipment. |
Freight class | Set the fallback class for packages without their own freight class. |
NMFC class | Enter the default NMFC code. It is used when the Order's Freight NMFC class is blank and can populate the carrier-generated BOL. |
Default package description | Enter the commodity description to use when the package does not provide one. |
Round dimensions less than 1 to 1 | Enable the minimum dimension of one in the units used for the carrier request. Dimension rounding also occurs independently of this option; this setting supplies the minimum rather than preserving decimal dimensions. |
Sender and Freight Billing
Complete Sender name, Sender company, Contact phone, and Contact email.
Use Override sender address when the physical shipment origin must differ from the Baseline Account. Complete the replacement address. For printed sender information, use the separate label-address option described under Labels Tab.
In Freight billing address:
Fedex freight account number: Enter the freight account used for this billing arrangement.
Override billing address: Enable it to enter the associated Billing name, Billing company, Address 1, additional address lines, City, State/province, Zip, Country, Phone, and Email.
Override alternate billing address: Enable it when an alternate freight billing party applies. Complete that party's account and address information, including Alternate fedex freight account number.
For an alternate-party arrangement using Sender or Third party payment, the alternate freight account is used for billing. Collect and Recipient arrangements retain their own billing treatment. Keep the physical origin, printed sender address, and freight billing address distinct.
Address Validation and Contact Handling
Address validation: Select No validation, Check residential, or Full validation. Check residential obtains the carrier's address classification; Full validation also requires a successfully resolved address.
Reformat ship-to phone: Enable formatting of the destination phone using the applicable country.
Substitute missing ship-to phone: Enable this option when an order without a destination phone should use a configured substitute.
Ship to phone: Enter the substitute phone number used by the preceding option.
Provide accurate contact information for the shipment. A substitute phone does not establish that a contact is suitable for a particular delivery service.
Signatures, Batteries, and Special Commodities
Use only settings applicable to the selected service and authorized account:
Adult signature and Indirect signature: Configure the corresponding signature requirement.
Dangerous goods regulation and Dangerous goods accessibility: Set the applicable regulation and accessibility for authorized dangerous-goods shipments.
Batteries: Control the account-level battery setting. When applicable, configure Battery material type, Battery packing type, and Battery regulatory subtype.
Alcohol and Alcohol recipient type: Configure alcohol handling and the recipient classification when supported for the shipment.
These settings do not replace the required package, item, dangerous-goods, or carrier-authorization information.
Notifications
Notify recipient by email: Request carrier notifications for the destination email supplied on the order.
Notify shipper by email: Request notifications for the configured sender contact.
Aggregation: Choose whether notifications are grouped per shipment or per package.
Events: Select the carrier events for which notifications are requested.
Personal message: Enter the message to include with the carrier notification.
Notification delivery and event availability depend on FedEx and the selected service.
International Shipping and Customs
Configure these fields when applicable to the selected international service:
Sender tax number: Enter the sender's applicable tax identifier.
Terms of trade: Set the account-level trade terms.
CI payment terms: Set the payment terms used for applicable commercial-invoice details.
Duties payment type, Duties payor account #, and Duties payor account country: Identify the party and account responsible for duties.
Export Reason and Customs item purpose: Identify the reason for export and the intended use of the goods.
Ignore WMS harmonized codes: Enable it only when harmonized codes received from the Integrated system must be excluded from the integration's customs data.
Skip trade documents: Suppress the applicable trade-document request. Arrange any required documents separately.
Electronic trade documents: Request electronic document handling where supported by the service and destination.
The recipient is not the importer: Enable it when the importer differs from the recipient, and complete the importer identity, address, account, and tax information.
Non-Fedex international customs broker: Enable it when using a separate broker, and complete the broker identity, address, phone, account, and tax information.
Enable ETD images: Enable the use of configured document images when applicable. Select Letter head image id and Electronic signature image id for the images registered with FedEx.
Review the documents actually returned for the selected freight service. The presence of customs settings does not mean that every service generates the same documents.
BOL Purchase Order Reference and Copies
Use Purchase order number (BOL) to select or define the reference included as the purchase order number on freight line items.
BOL repeat does not control the number of BOL copies in the current integration. Do not use this field to set the BOL copy count.
Specifying Rate Shopping Service Codes
When using Rate Shopping, restrict the service codes considered for this Client Account to the freight services appropriate to its shipments.
For detailed instructions, see: Include or exclude Service Codes when Rate Shopping [Step-by-Step Guide].
Label References
Configure Reference 1, Reference 2, Reference 3, and Reference 4, together with their corresponding reference types, in the Client Account's General tab, under Labels.
The integration sends up to four populated label references. Each Client Account reference and reference type takes precedence over its corresponding Baseline Account value; a blank Client Account setting falls back to that Baseline value.
If Allow reference truncation is enabled, each reference value is limited to 40 characters before it is sent. Reference types identify the purpose of the value; the carrier determines its presentation on the label.
For detailed instructions, see: Using order References in your labels [Step-by-Step guide].
Finalizing the Setup
Once you have entered the required information, click Save.

With the account configured and requirements verified, you can now proceed to process orders as described below.
Configuring an Order
The steps described in this section are not required for carrier setup, and they are offered as an optional review if further order-level configuration is required.
Follow the UI Navigation steps in 📄 05 - How to edit an order’s information - [Step-by-Step guide], using the carrier-specific values provided in this guide.
Carrier Tab
Service, Classification, and Accessorials
Service code: Confirm the freight service.
Currency code: Supply the order's transaction currency when required.
Freight NMFC class: Enter the NMFC code for this shipment. It takes precedence over the Client Account's NMFC class and is applied to the shipment's freight line items and carrier-generated BOL. If both fields are blank, no NMFC code is supplied.
Stackable: Indicate whether the freight can be stacked. Non-stackable FedEx Freight Priority and FedEx Freight Economy shipments are identified accordingly.
Booking confirmation number: Enter the booking confirmation for an applicable Express Freight service.
Lift gate for pickup, Inside pickup, Lift gate for delivery, and Inside delivery: Select the services required at the origin and destination.
Limited access, Call before delivery, Protection from freezing, and Food: Select the conditions and handling services applicable to the shipment.
Over length and Extreme length: Identify the applicable oversized-freight condition.
Freight collect terms type: Select the applicable freight collect terms.
Freight guarantee type and Guarantee date/time: Specify the applicable guarantee and its date or time.
Residential: Specify the destination classification when required.
Signature required: Request the applicable signature service for the shipment.
Skip address validation: Bypass the account-level validation check for this order when appropriate.
Block insight visibility: Request that the shipment be excluded from the applicable FedEx InSight visibility.
Review package-level freight class, weight, dimensions, quantities, and commodity description before processing. The order-level NMFC code is a separate value from each package's freight class.
Freight Direct
Freight direct type: Select the required Freight Direct level. Basic and Basic by appointment are distinct selections; use the one required for the shipment.
Transportation type: Select
DELIVERY,PICKUP, or both as applicable to the requested Freight Direct service.
For DELIVERY, provide the destination phone and email. For PICKUP, provide the origin phone and email. The selected Freight Direct level is used for rating and processing, and independently selected services such as non-stackable handling are retained.
The integration uses MOBILE as the Freight Direct phone type unless the order custom field FEDEX_FREIGHTDIRECTPHONETYPE specifies another applicable value, such as HOME or WORK. A dedicated phone-type selector is not currently available in these carrier settings.
Selecting Freight Direct pickup handling does not create a pickup booking.
Order-Level Freight Billing
When order-level third-party billing overrides are enabled for the Client, the Freight Billing group is available in the Order's Carrier tab.
Configure Freight Payment Terms, Account #, and the applicable Name, Company, Address 1, additional address lines, City, State, Postal, Country, Phone, and Email for the order's billing party.
Use these fields for shipment-specific billing changes. Keep account numbers and address details consistent with the party authorized to pay the freight charges.
International Order Details
When applicable, review:
Terms of sale and CI Payment terms for order-specific trade and payment terms.
Export Reason for the order's reason for export.
Recipient tax ID, Sender tax ID, Bill-to tax ID, and Importer tax ID for the relevant parties.
ITN number or FTR exemption or B13A number and B13A Filing Option Type for the applicable export declaration.
Duties payment type, Duties payor account #, and Duties payor account country for the order's duties billing.
Order-provided trade terms, commercial-invoice payment terms, and duties billing can override their account-level counterparts.
Click Save to apply the order-level changes. After the Order is updated, continue with the standard shipping workflow.
Troubleshooting
Registration address rejected: Compare the registration name and address with the exact account records held by FedEx. Review the invoice and shipping-address records in FedEx Ship Manager. If the correct registration address remains unclear, ask the FedEx representative to confirm the address associated with third-party registration.
Freight account or address mismatch: Review the Client Account's Freight billing address and Fedex freight account number. For alternate billing, also review Override alternate billing address and Alternate fedex freight account number. Confirm that the selected account and address belong to the intended billing party.
NMFC code rejected or unexpected on the BOL: Check the Order's Freight NMFC class first, then the Client Account's NMFC class if the order field is blank. Use a valid code with its required leading zeros and suffix. An invalid order value overrides a valid account value; correct or clear the order value as appropriate. Review the generated BOL after processing.
Unexpected freight class: Review each package's freight class before the Client Account's Freight class. If neither is set, verify package weights and dimensions because they can determine the calculated class. Review any carrier classification warnings.
Freight Direct selection or charges differ: Check Freight direct type, Transportation type, and the relevant origin or destination contact information. When comparing a quote, match the account, ship date, service, route, package details, and accessorial selections. Compare the returned charge breakdown rather than adding a fixed Freight Direct amount.
Pickup was not booked: Review Pickup mode and the warehouse's existing carrier arrangement. The current settings identify dropoff, recurring pickup, or direct carrier scheduling; they do not submit an automated pickup booking.
Address validation blocks processing: Review the destination address and Address validation. Full validation requires a successfully resolved address. Correct the shipment data; use Skip address validation only when bypassing that check is appropriate.
Quoted and processed charges differ: Review the selected service, billing party, package details, and accessorials. Check Quote vs shipping rate validation and Max rate discrepancy in the Baseline Account.
Intermittent carrier failure: For recognized temporary errors, review Transient error retry count, Retry delay (ms), and Transient error codes. A configured policy retries only matching carrier error responses; it does not establish that every failure is safe to retry.
Missing label or document: Review the selected Mode, Size, and printer configuration for shipping labels. Review the BOL and any returned CI separately; thermal-label settings do not determine whether all international documents are available.
Void returns a carrier error: A failed cancellation response, including
NOT.FOUND, does not confirm carrier cancellation. Retain the shipment and tracking details and confirm its status with FedEx before treating the shipment as canceled.