How to configure Loomis (LOOMIS) in techSHIP [Guide]
Last updated: October 28, 2026
This guide explains how to add and configure this carrier connection, review its available carrier-specific settings, and understand the shipment requirements and operational constraints that apply.
Carrier Requirements and Specifications
This section summarizes onboarding requirements and lists confirmed carrier-specific constraints.
To review all supported carriers and their specific requirements, see: 📄 techSHIP supported Carriers - Master List [Guides List].
Onboarding Requirements
The Loomis integration supports:
Void
Rate Shop
Track History through techTRACK
3rd Party Billing
Collect (COD)
Label References
Dangerous Goods
Signature and Adult Signature
Saturday Delivery
End-of-Day Manifests and Pickup Scheduling
Information to be Provided
The following credentials and account details are required to set up Loomis:
DATA ELEMENT | SOURCE (HOW TO OBTAIN) |
|---|---|
User Id and Password | Obtain the production API credentials from Loomis Express support. |
Shipper account # | Obtain and verify the account number with Loomis Express or the account owner. |
Warehouse induction address | Obtain the sender company, street address, city, province, postal code, and country from the warehouse or account owner. |
Have your pickup arrangement and warehouse contact details available. If pickup scheduling is required, also obtain the warehouse opening and closing times and the preparation time needed before collection.
For retailer-owned accounts, use the credentials and sender information officially provided by the retailer.
Specifications and Constraints
Operational Details
Use this integration for parcel shipments with Loomis ground and express services. Configure the warehouse induction address on the Baseline Account; it supplies the pickup address used for rating, shipment processing, and pickup scheduling.
End-of-day manifests: Loomis provides the manifest document after end-of-day processing. Enable the corresponding Baseline Account setting when finalizing shipments must also close the carrier's shipping day.
Recipient names: The recipient name and company must each contain 45 characters or fewer.
Batch handling: When end-of-day processing is enabled and manifests are managed per batch, only one open batch per Baseline Account is allowed.
Returns: This shipping integration does not implement separate return shipments or return-label generation.
Configuring a Baseline Account
A Baseline Account serves as the fundamental connection point between techSHIP and the carrier's system. It acts as a template that holds the credentials and fundamental properties required to process shipments.
The techSHIP AI Assistant is available from the Carrier page for supported Carrier configuration tasks. For detailed conceptual information and advanced configuration, refer to 📄 techSHIP AI Assistant: Overview & Availability [Information].
Adding a Carrier
Before adding an account, you must ensure the Carrier entity is available for your location.
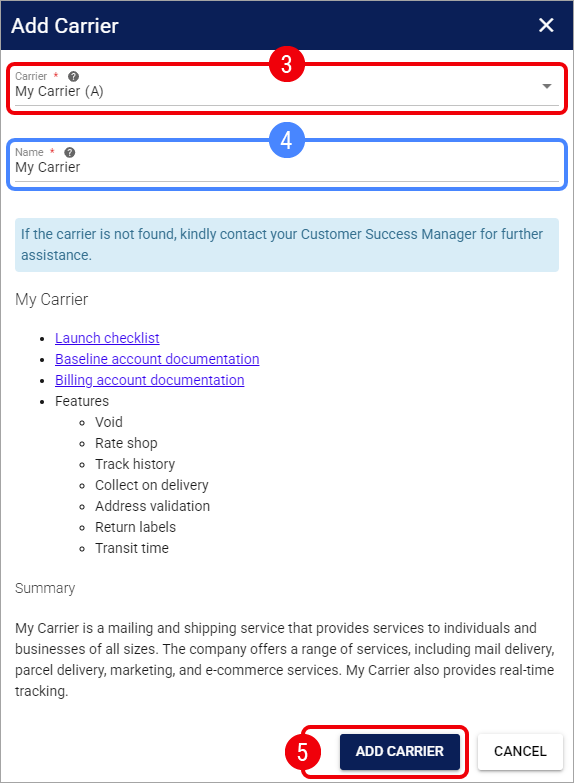
Click My Carriers from the left menu under the Carriers category.
Click Add Carrier.

Select the desired Carrier.
You may encounter additional messages depending on the carrier status or your plan:
Subscription Required (⭐): If the carrier has a star icon, you will see a message stating "To use this carrier, a subscription upgrade is required." Press Contact to Upgrade to proceed.

Carrier Suspended: If the carrier has not been used for an extended period, you will see a message stating “This carrier is currently on hold...” Click Request Assistance to reactivate it.

Setup Fee Waived: If a carrier from the same carrier group is already installed in your location, you can add this carrier without incurring additional fees.

If needed, update the carrier Name.
Click Add Carrier.
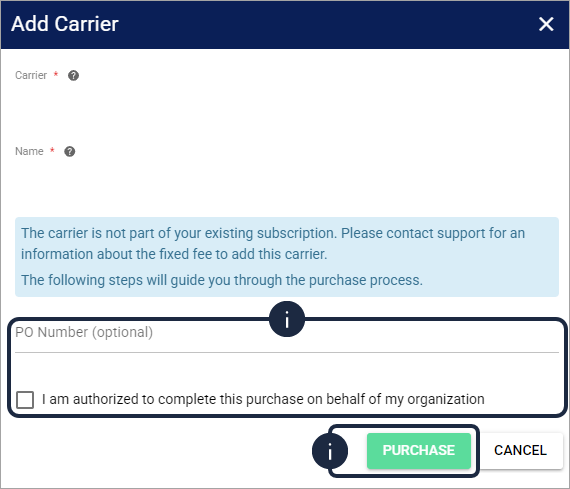
If the purchase confirmation appears, complete the following steps:
Review the purchase notice and any applicable charge information.
Optionally enter a PO Number.
Select I am authorized to complete this purchase on behalf of my organization.
Click Purchase to confirm the Carrier addition.
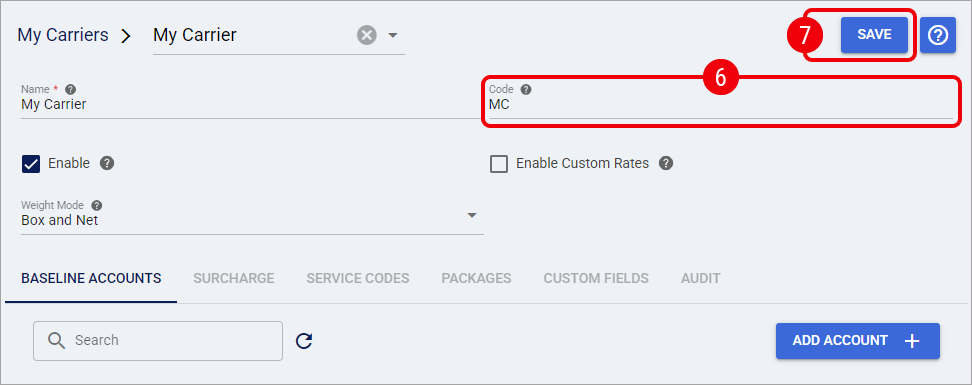
Once the Carrier is added, you will be automatically redirected to the Carrier page to continue setting it up.
Enter the Code of the Carrier as it appears in your host system.
The Code of the Carrier must match exactly the value defined in the host system. Any discrepancy (including casing or extra spaces) may prevent the carrier from working correctly.
Click Save.
If your facility utilizes the centralized Pickup Schedule, we highly recommend adding this new carrier to your calendar now. While not required to process labels, this ensures accurate induction metrics for your Insights dashboards. To learn more, see 📄 Understanding the Centralized Pickup Schedule & Expected Induction Logic [Information].
Adding a Baseline Account
From the Carrier page, click Add Account to create a new Baseline Account.

You will be redirected to the Baseline Account page to complete the setup.
Entering incorrect values will prevent the system from generating shipping labels.
General Tab
In the General tab, define the administrative properties:

Name: Enter a descriptive name for the account.
Enter a descriptive name based on unique properties. E.g.:
Carrier Name - Account Number (CarrierX - 123456789)
Carrier Name - Consolidator Name (CarrierY - MyConsolidator)
Carrier Name
Usage: Select the most suitable option:
Test: Used for sandbox or onboarding purposes.
Production: Used for live shipping.
Keep the Status field set to its default Active value. An account must be Active to remain fully editable. For detailed conceptual information on account statuses, refer to 📄 How to Inactivate and Activate a Carrier Baseline Account [Step-by-Step Guide].
Carrier Tab
Connection
User Id: Enter the API username provided for the account.
Password: Enter the corresponding API password.
Pickup and End-of-Day Settings
Pickup Mode: Select the pickup arrangement for the account. Choose Per Batch to request a pickup when the batch is finalized.
End of day on finalize: Enable this to submit end-of-day processing to Loomis during finalization.
Contact name, Contact phone, Contact phone extension, and Contact email: Enter the warehouse contact details. The phone, extension, and email are used in pickup information.
Pickup open time and Pickup close time: Enter the warehouse collection window. Complete Pickup close time when using Per Batch, because the pickup request requires it.
Pickup ready hours: Enter the preparation time, in hours, added to the current Eastern time when calculating readiness for an automatic pickup. The calculation adjusts to the configured collection window and moves weekend pickups to Monday.
Sender Address
Complete Sender company, Address 1, City, Zip, and Country. Add Address 2 and State/province as applicable.
The Country field is required and offers Canada and United States. Select the country matching the warehouse induction address.
Labels Tab
Label output: The integration retrieves thermal labels in ZPL or nonthermal image labels. techSHIP can convert image labels to PDF when PDF conversion is requested.
Use Mode to configure the Baseline Account's label preference for your printing workflow.
Finalizing the Setup
Once you have entered the required information, click Save.

After you save the Baseline Account, check whether the Registration tab or a registration status badge is available.

If neither is available, the Carrier does not use this Registration workflow in techSHIP. If registration is still pending, open the Registration tab and press Registration, then complete 📄 How to Register a Carrier Baseline Account [Step-by-Step Guide] before creating shipments.
From the Carrier page, you can now see the Baseline Account listed with the administrative status Active. The Active status is separate from the account's registration status.

The Baseline Account configuration is now saved. You can continue with Configuring a Client Account below to assign the Baseline Account to a specific Client.
Configuring a Client Account
Adding an Account
Before adding a Client Account, ensure that the Client has been created. For instructions creating a Client, see: 📄 10 - How to create a Client profile [Step-by-Step guide].
Click Clients from the left menu under the Clients section.
Click the Edit icon for the desired Client.

Click Add Accounts.

Optionally, use the Search box to search by Baseline Account Name or Carrier.
Select the Baseline Accounts that will serve as the foundation for your new Client Accounts.
Click Add Accounts.

A toast notification will confirm the accounts were successfully assigned. Click the Refresh icon if recently added accounts are not displayed.

Click Edit on each newly created account.
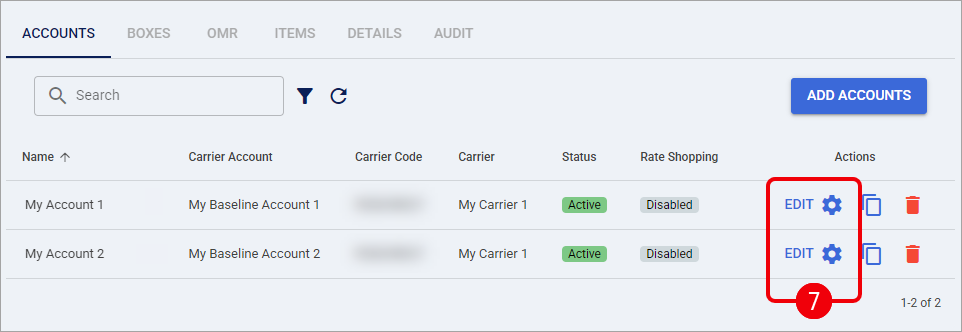
Configure the available options in each tab (except Carrier).

For complete instructions on configuring this settings, see 📄 How to configure the Billing Account General Options tab [Step-by-Step guide].
Carrier Tab
Service code: Select the default service for orders without an imported service selection.
Override WMS Service Code: Enable this to replace the service selection supplied by the Integrated system with the account's configured service.
Collect/Prepaid: Choose Collect or Prepaid for the account's pickup billing arrangement.
Shipper account #: Enter the required Loomis shipper account number.
Collect Account #: Enter the collect billing account number when applicable. This value is used for rating and shipment processing unless an enabled order-level override replaces it for shipment processing.
Cost centre: Enter a valid cost centre only when needed for billing allocation. This field is optional; leave it blank when none applies.
Adult signature: Select Default to follow the order's adult-signature selection, Enable to request adult signature for all orders, or Disable to suppress adult signature. A regular signature can still apply.
Specifying Rate Shopping Service Codes
If you use Rate Shopping, configure which service codes to include or exclude in the Client Account's Rates & Markups tab.
For detailed instructions on how to configure this, see: Include or exclude Service Codes when Rate Shopping [Step-by-Step Guide].
Label References
Configure Reference 1 and Reference 2 in the Labels group of the Client Account's General tab. Loomis uses two references:
Reference 1: Supplies the shipment-level reference.
Reference 2: Supplies the package-level reference and can resolve order and package values. If it resolves to an empty value, the package identifier is used.
For a comprehensive guide on how to use label references, see: Using order References in your labels [Step-by-Step guide].
Finalizing the Setup
Once you have entered the required information, click Save.

With the account configured and requirements verified, you can now proceed to process orders as described below.
Configuring an Order
The steps described in this section are not required for carrier setup, and they are offered as an optional review if further order-level configuration is required.
Follow the UI Navigation steps in 📄 05 - How to edit an order’s information - [Step-by-Step guide], using the carrier-specific values provided in this guide.
In the Order's Carrier tab, configure the applicable Loomis options:
Service code: Select the service for this shipment.
COD amount: Enter the amount to collect on delivery when COD is needed.
COD Method: Select the collection method when COD amount is populated.
Signature required: Select to request a regular signature.
Signature adult: Select to request an adult signature when the Client Account's Adult signature is set to Default.
Dangerous Goods: Select to identify the shipment as requiring dangerous-goods handling.
Saturday Delivery: Select to request Saturday delivery.
When third-party billing overrides are enabled for the client, enter the shipment's collect billing account in Account # under Freight Billing in the Order's Carrier tab. It replaces the Client Account's Collect Account # for shipment processing; rating continues to use the Client Account value.
Click Save to apply the order-level changes. After the Order is updated, continue with the standard shipping workflow.
Troubleshooting
Authentication fails: Check User Id and Password in the Baseline Account's Carrier tab and verify Shipper account # in the Client Account's Carrier tab against the account owner's production details. Leave Cost centre blank unless a valid value applies; do not invent a value to complete setup.
Recipient name or company is rejected: Shorten the affected recipient name or company to 45 characters or fewer in the order's delivery address before processing.
No eligible rates: Check the Client Account's Rates & Markups service restrictions and its Shipper account # and Collect Account #. For an order-level third-party override, remember that rating uses the Client Account's collect account rather than the override.
Another batch cannot be opened: If End of day on finalize is enabled with manifests managed per batch, finalize the existing open batch associated with the same Baseline Account before creating another.
Pickup scheduling fails after finalization: Check Pickup Mode, Pickup close time, the warehouse contact details, and the sender address in the Baseline Account's Carrier tab. Batch finalization can complete even when the pickup request fails, so verify the pickup result separately.
An adult signature is missing or unexpected: Check Adult signature in the Client Account's Carrier tab. Enable and Disable override the order's Signature adult selection.
No return label is produced: The visible Print return labels control is not implemented by this integration. Use a separately supported return-shipping process.